部署系统到阿里云Serverless应用引擎SAE
为提升云帆考试系统的弹性和资源利用效率,我们可以将其部署于阿里云Serverless应用引擎(SAE)。 该方案的核心优势在于自动化弹性伸缩。SAE平台负责底层资源的调度与管理,系统可根据实际负载(如并发考生数、请求压力)动态、无缝地扩展或收缩计算资源。这不仅消除了手动扩容的繁琐和延迟风险,确保在考试高峰期的服务稳定性与流畅体验,也显著降低了系统在非高峰时段的闲置资源成本,实现了运维效率与成本效益的双重提升。
使用容器镜像服务
Serverless 部署基于容器技术,我们需要将本地打包好的 Docker 镜像上传到容器镜像服务中,后续部署 Serverless 实例时将直接调用此镜像运行。
开通服务
由于我们操作的服务比较简单,开通个人版即可满足需求 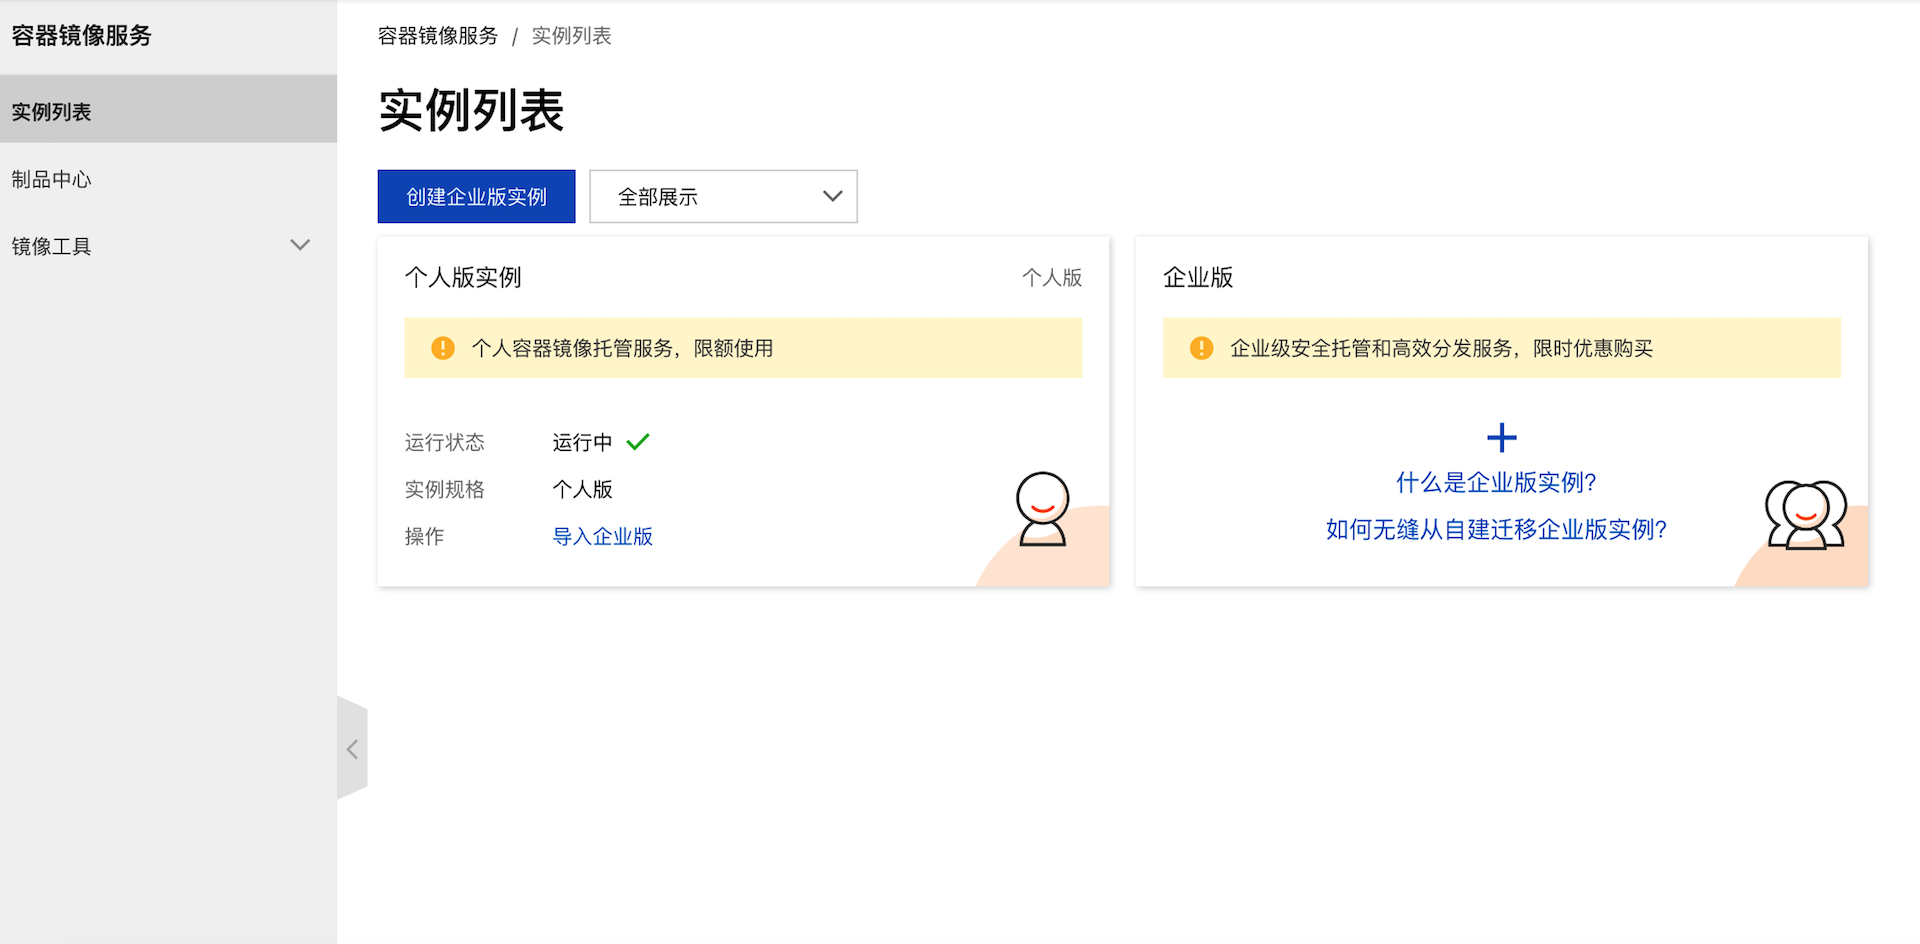
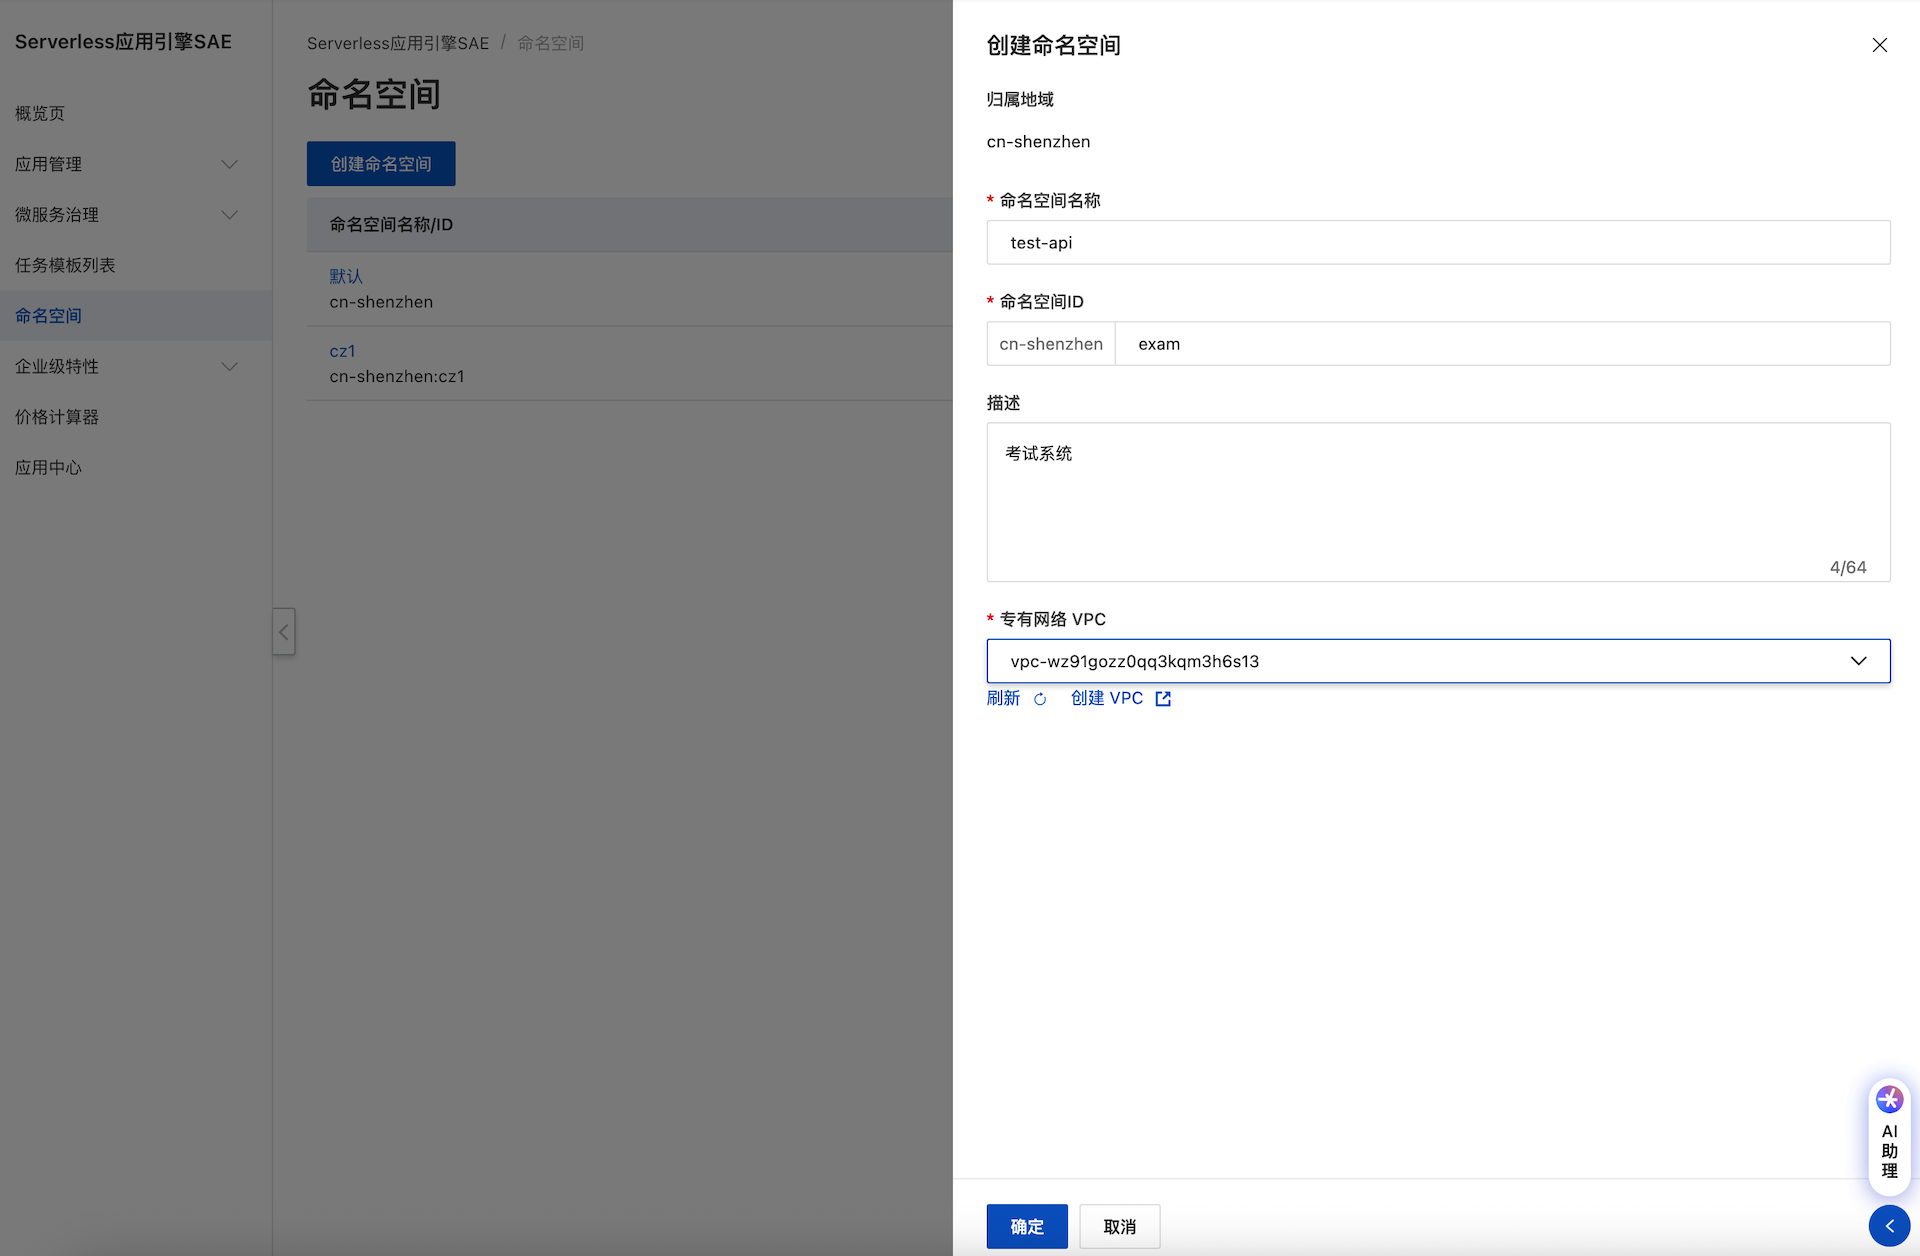
创建命名空间
创建命名空间exam-pod-test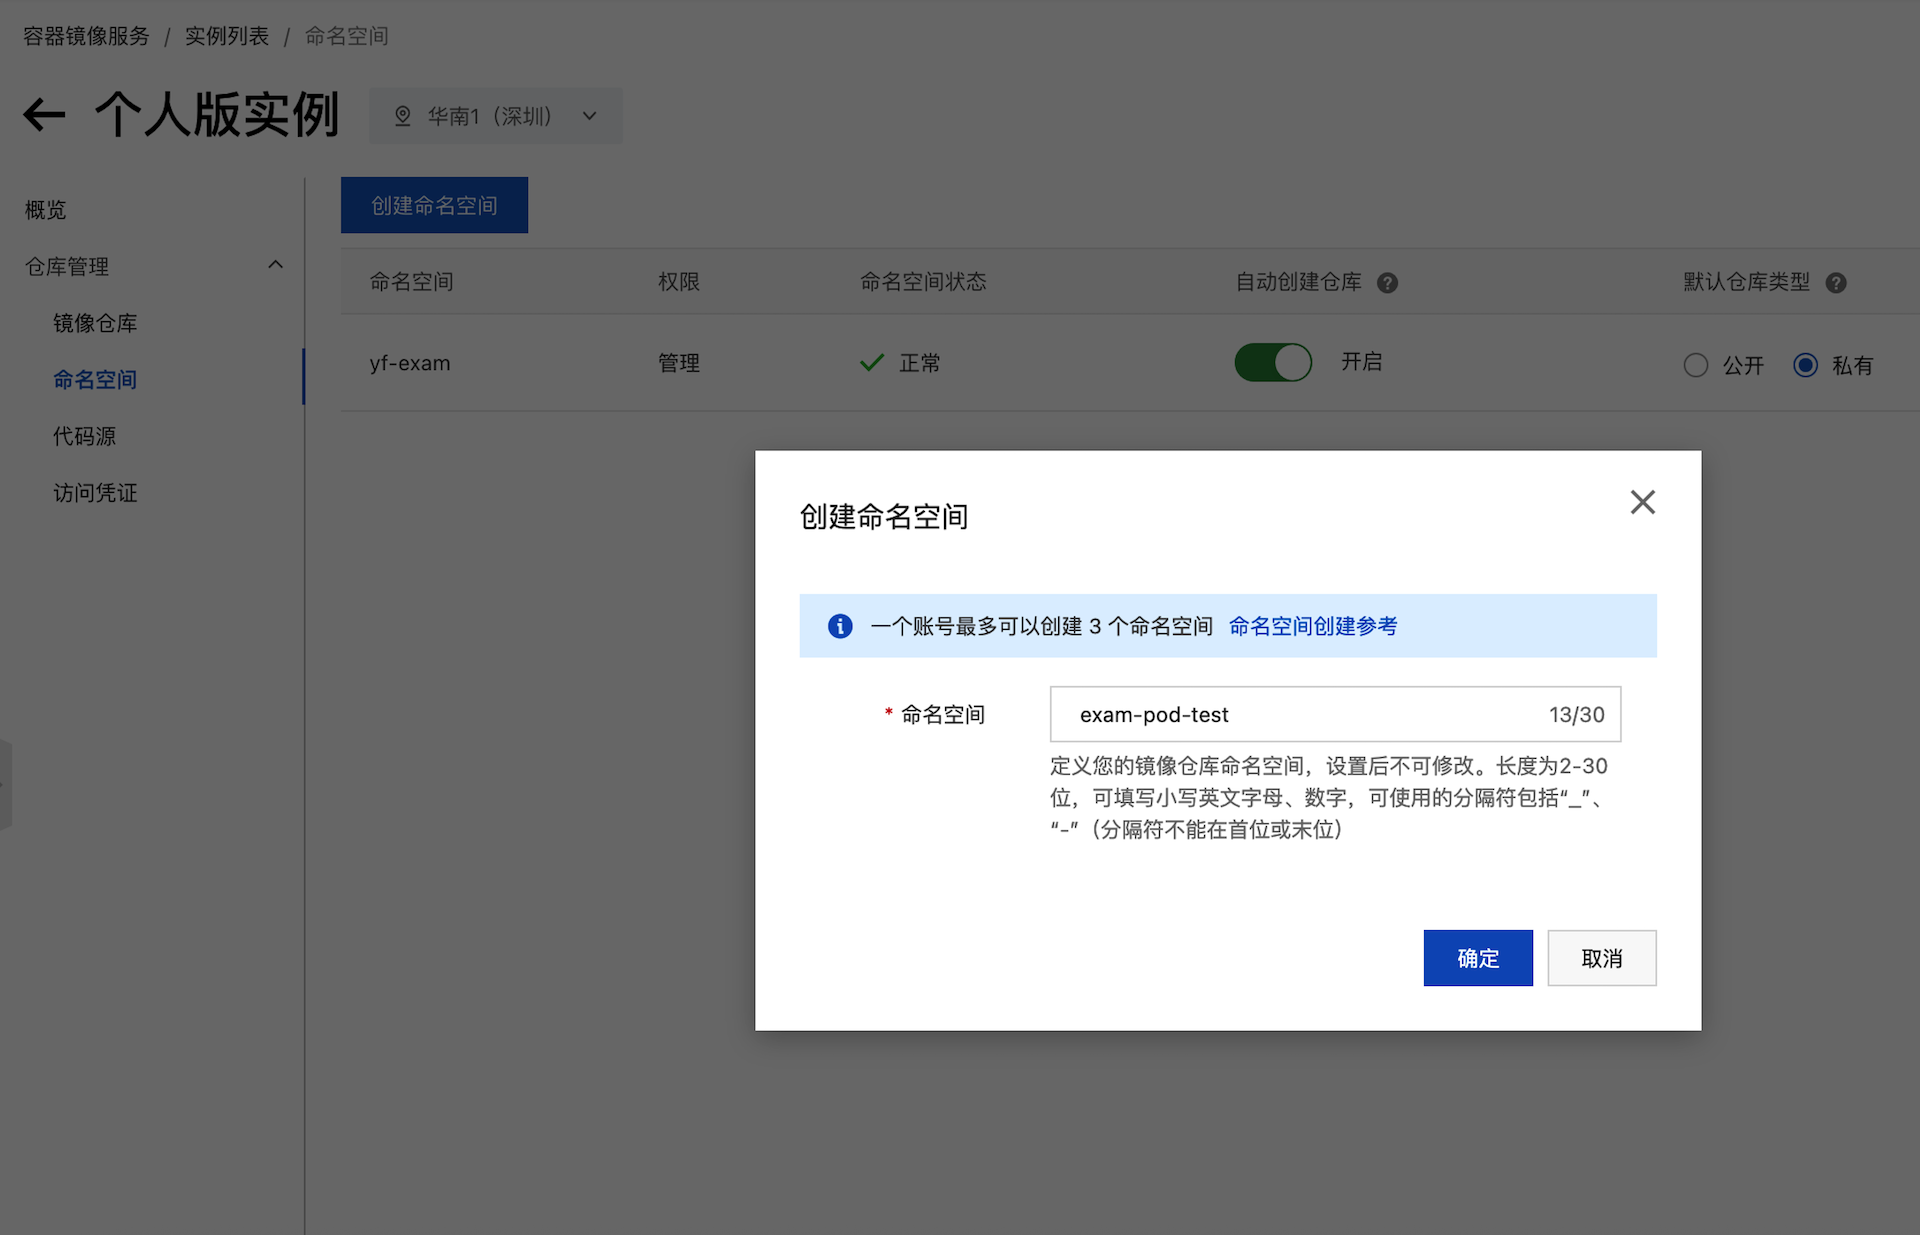
创建镜像仓库
创建镜像仓库exam-pod-api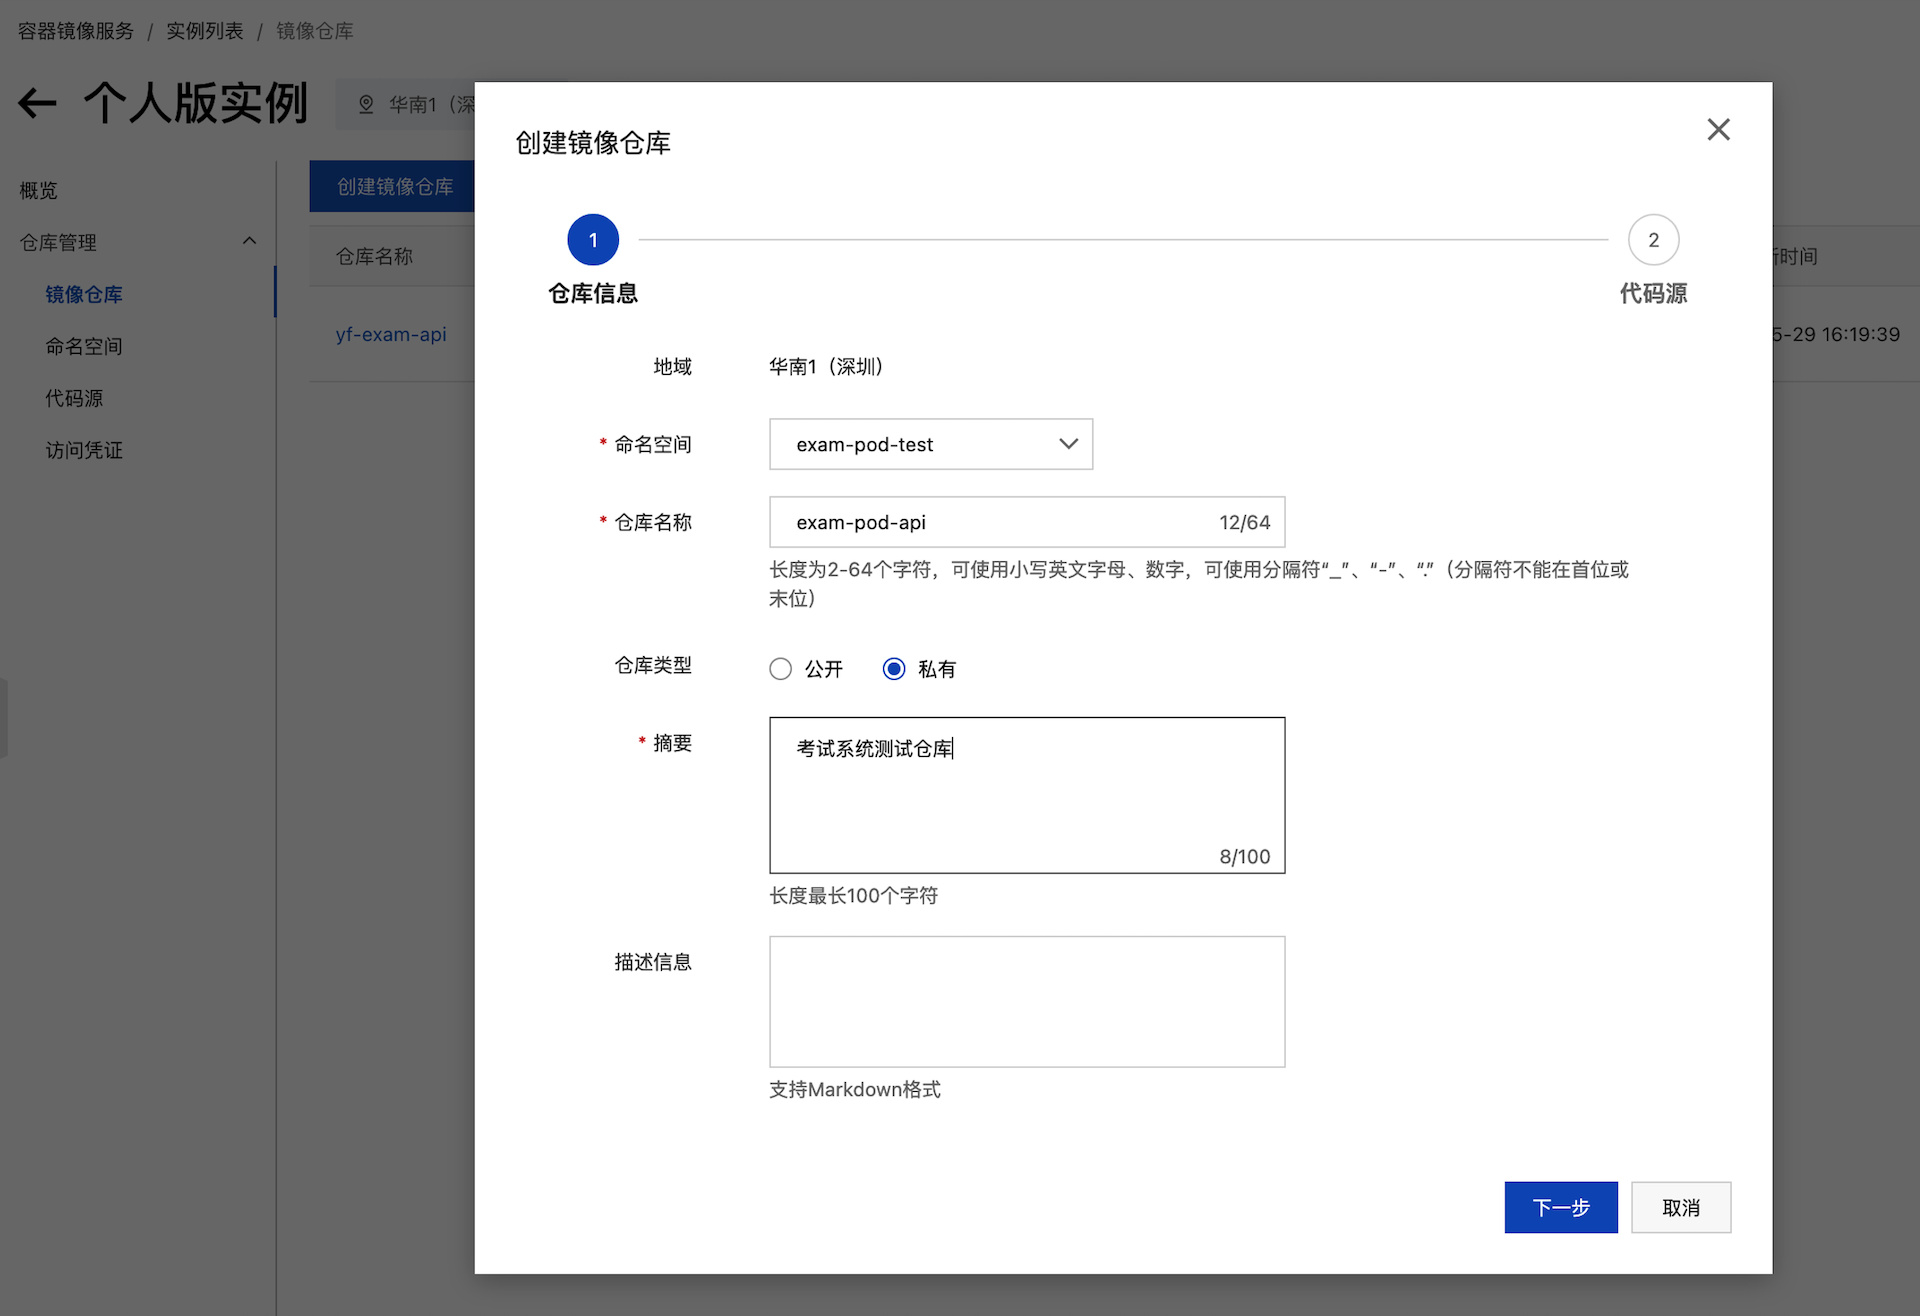
代码源选择本地仓库 我们直接从本地开发编译推送到镜像仓库 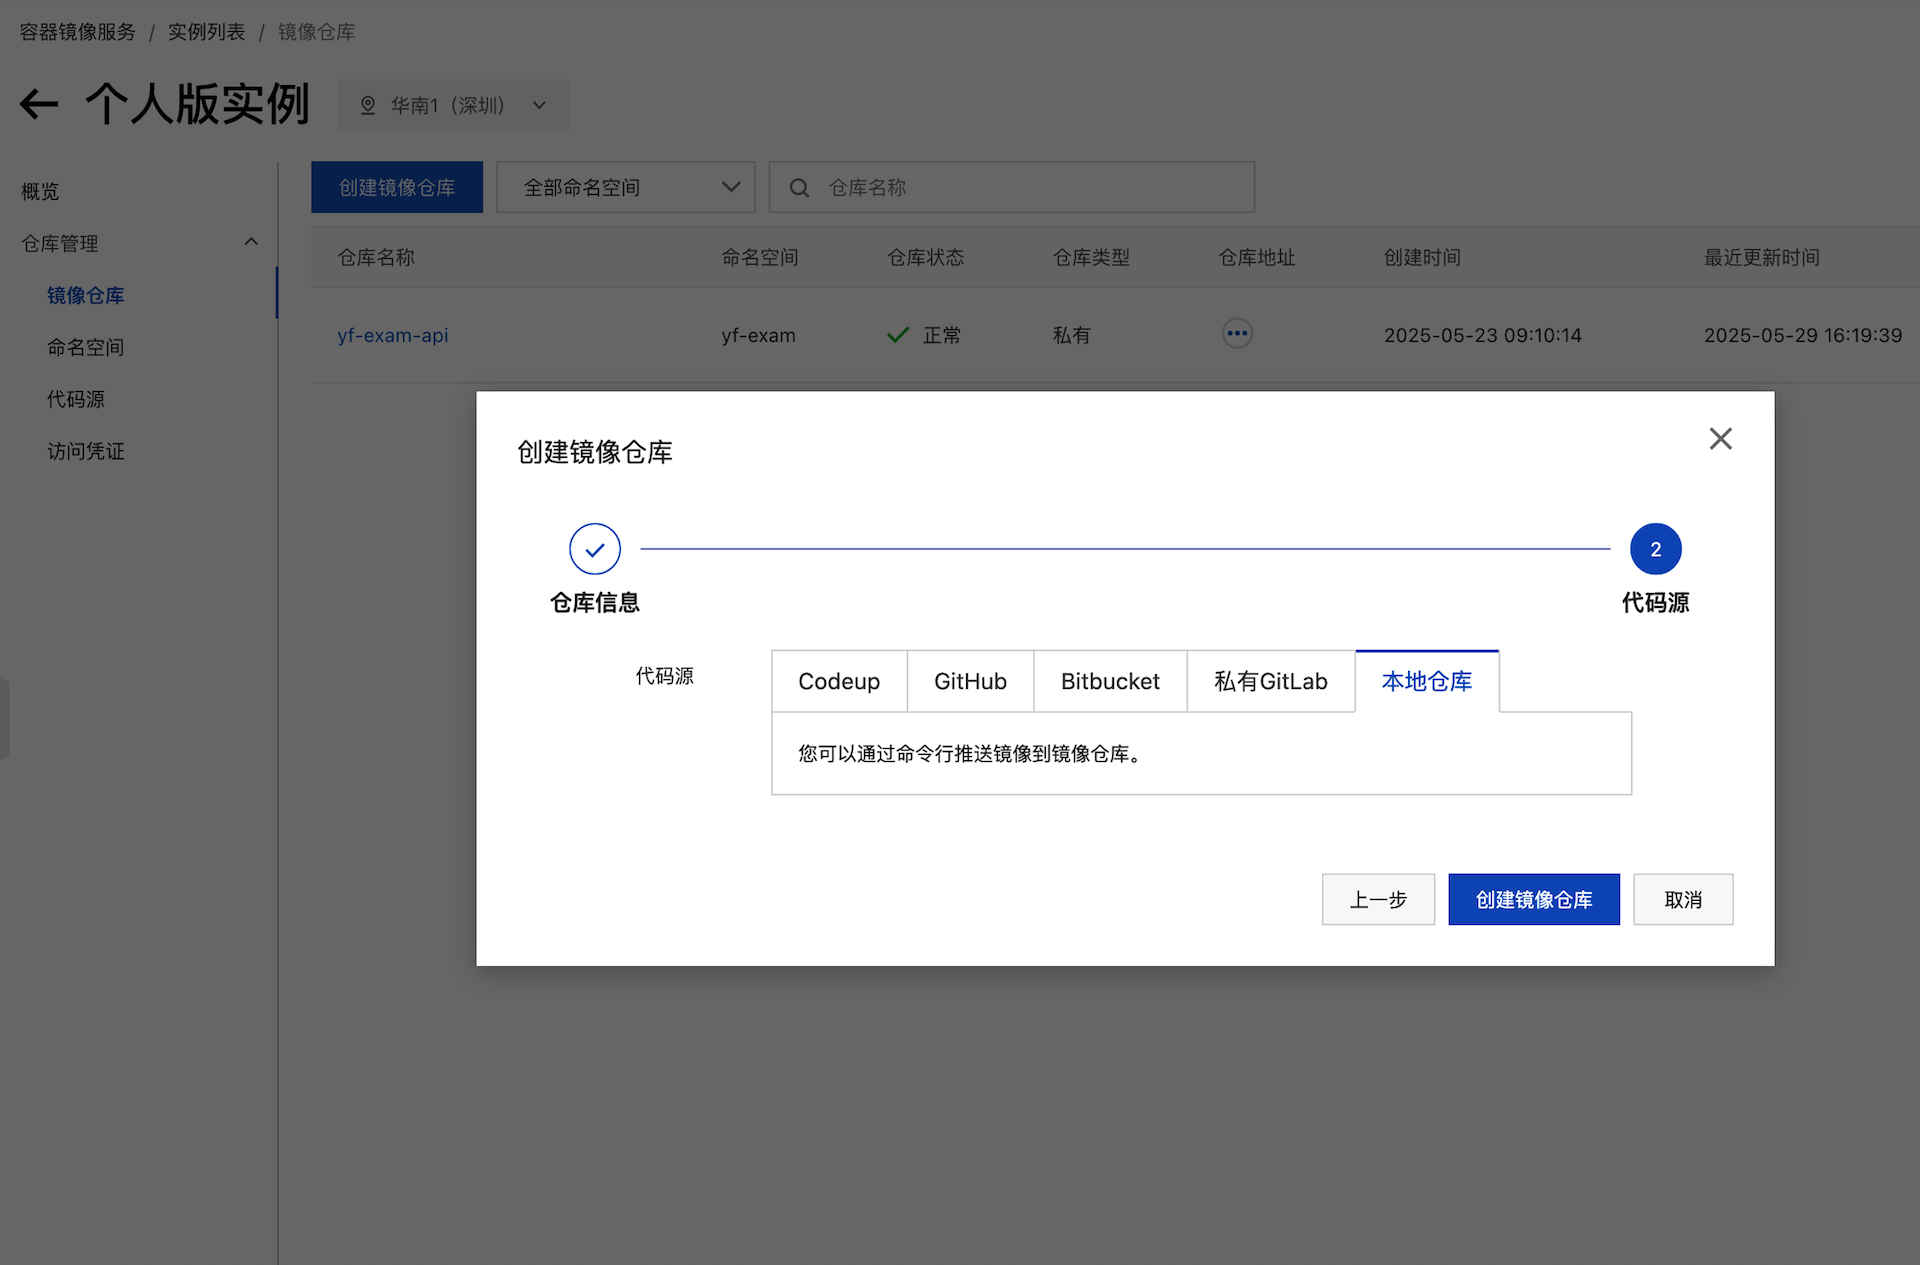
创建好以后,显示镜像仓库的基本信息,根据指引登录到本地授权 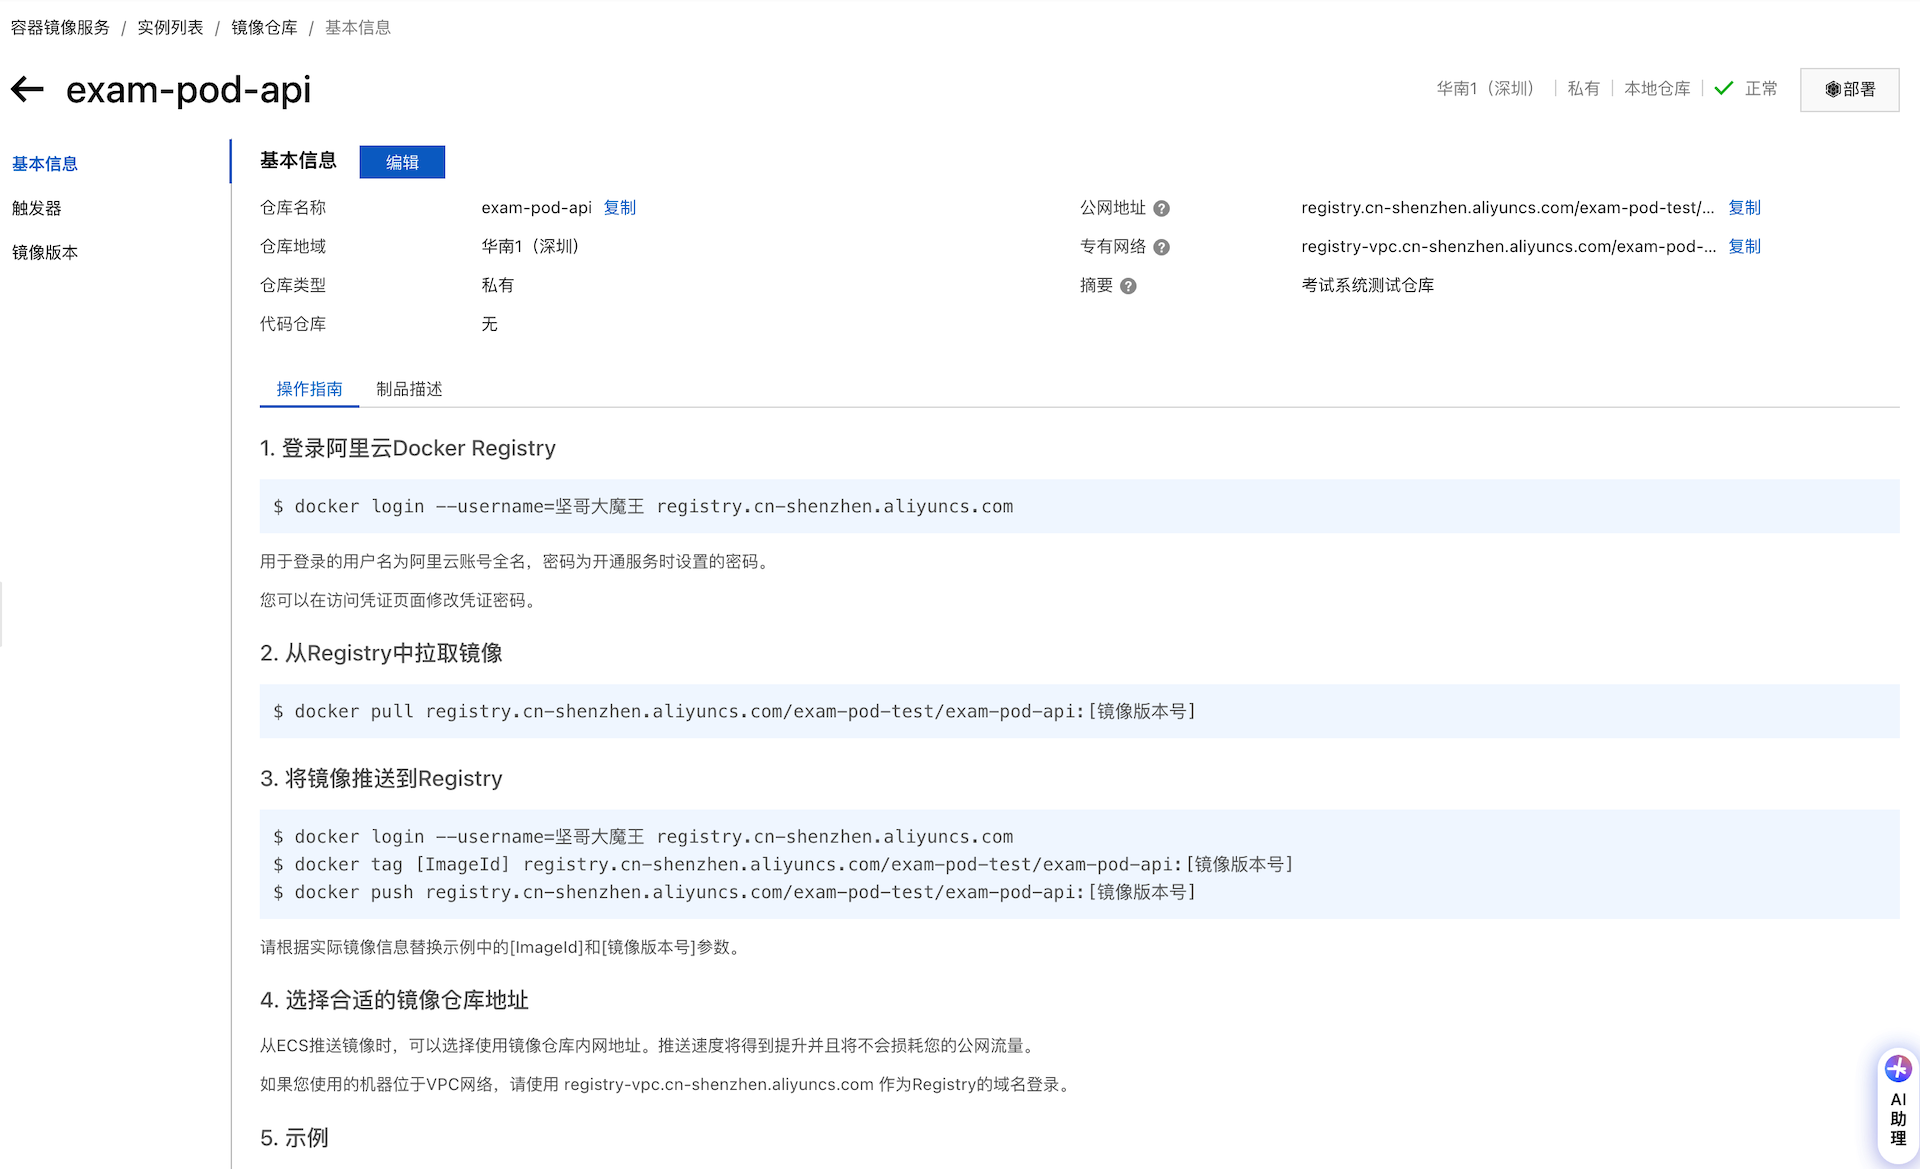
# 复制指引1的内容,在本地命令行执行,如:
docker login --username=your-username registry.cn-shenzhen.aliyuncs.com
# 输入密码:第一次开通容器镜像时创建的密码
本地编译上传镜像
本地编译镜像,需要依赖Docker,确保本地已经安装好Docker并正常工作; 由于Docker需要登录,请自行解决网络问题。
修改pom.xml文件信息
修改yf-web/pom.xml文件,pom.xml包含了镜像名称和版本号,请将它换成上一步获得的镜像仓库信息,如下:
<plugin>
  <groupId>io.fabric8</groupId>
  <artifactId>docker-maven-plugin</artifactId>
  <version>0.40.2</version>
  <configuration>
    <images>
      <image>
        <name>registry.cn-shenzhen.aliyuncs.com/exam-pod-test/exam-pod-api:${version}</name>
        <build>
          <dockerFile>Dockerfile</dockerFile>
        </build>
      </image>
    </images>

    <!-- 登录docker hub的账号,用于镜像拉取 -->
    <authConfig>
      <username>登录Docker的账户</username>
      <password>登录Docker的密码</password>
    </authConfig>
  </configuration>
</plugin>
编译考试系统项目
使用Maven编译整个考试系统项目,在最外层的Lifecycle对项目执行install
编译成功后,或生成jar包yf-web/target/yf-exam-api.jar
系统会自动将yf-web/target/yf-exam-api.jar复制到yf-web/src/main/docker中 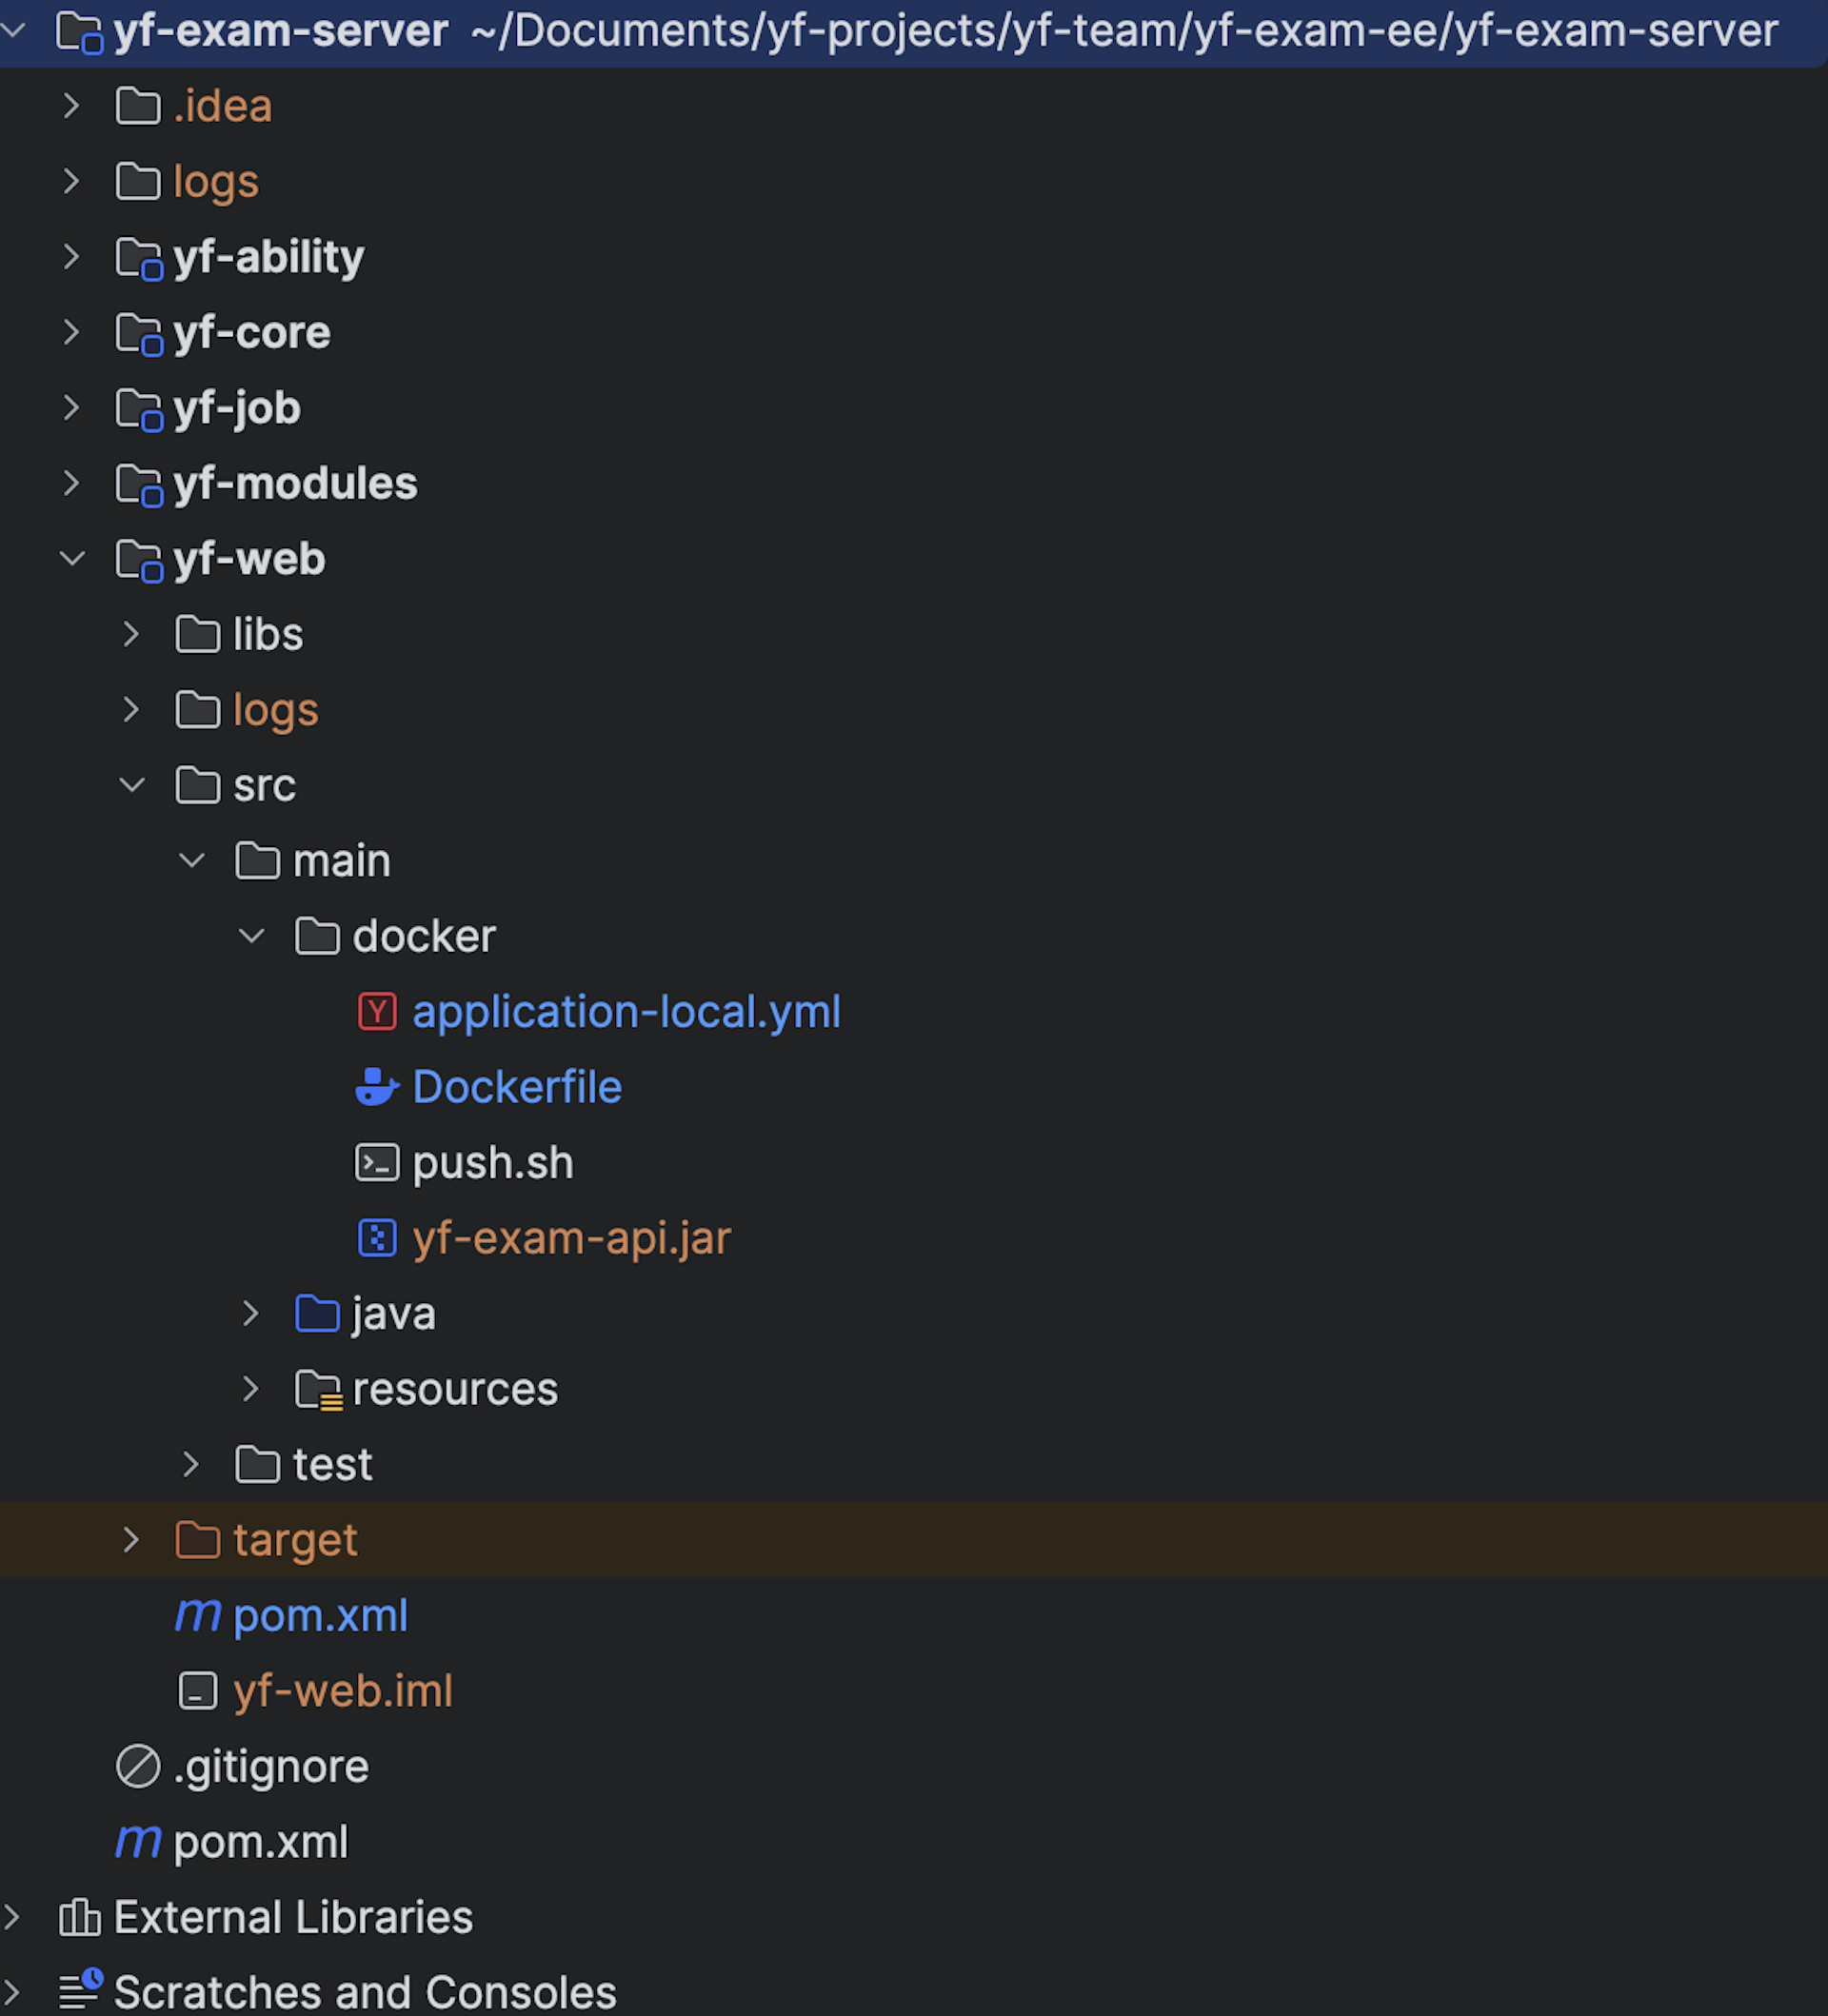
修改配置文件
在docker目录中,application-local.yml为项目配置文件,里面提前配置好数据库连接、Redis等内容 文件示例如下:
# 完整的外挂配置文件
server:
  port: 8101
  # 启用服务端压缩
  compression:
    enabled: true
    min-response-size: 10
    mime-types: application/json,application/xml,text/html,text/xml,text/plain,application/javascript,text/css

  tomcat:
    threads:
      max: 5000       # 最大工作线程数 (建议公式:max = (CPU核数 * 200))
      min-spare: 100 # 最小空闲线程
    accept-count: 3000 # 等待队列长度
    max-connections: 20000 # 最大连接数
    connection-timeout: 30000 # 连接超时(ms)

spring:
  application:
    name: yf-exam-api
  profiles:
    active: dev
  main:
    allow-bean-definition-overriding: true
  jackson:
    date-format: yyyy-MM-dd HH:mm:ss
    time-zone: GMT+8
    default-property-inclusion: non_null
    deserialization:
      fail_on_unknown_properties: false
    parser:
      # 允许出现特殊字符和转义符
      allow_unquoted_control_chars: true
      #允许出现单引号
      allow_single_quotes: true
    serialization:
      fail-on-empty-beans: false
    mapper:
      # 支持类型转换
      allow-coercion-of-scalars: true

  # 数据库配置
  datasource:
    type: com.alibaba.druid.pool.DruidDataSource
    driver-class-name: com.mysql.cj.jdbc.Driver
    url: jdbc:mysql://xxxxx.rwlb.rds.aliyuncs.com/yf_exam?useUnicode=true&characterEncoding=UTF-8&useSSL=false&serverTimezone=Asia/Shanghai&allowPublicKeyRetrieval=true
    username: root
    password: root
    # druid相关配置
    druid:
      # 连接池容量
      max-active: 5000
      initial-size: 30
      min-idle: 30
      max-wait: 10000
      # 连接保活
      validation-query: "SELECT 1"
      test-while-idle: true
      test-on-borrow: true
      test-on-return: false
      time-between-eviction-runs-millis: 300000
      min-evictable-idle-time-millis: 600000
      max-evictable-idle-time-millis: 660000
      # 性能优化
      async-init: true
      pool-prepared-statements: true
      max-pool-prepared-statement-per-connection-size: 20
      # 超时配置
      connect-timeout: 3000
      socket-timeout: 720000
      # 回收
      remove-abandoned: true
      remove-abandoned-timeout: 120
      # 监控统计
      filters: stat
      filter:
        stat:
          log-slow-sql: true
          slow-sql-millis: 5000

  # Redis配置
  redis:
    database: 0
    host: xxx.redis.rds.aliyuncs.com
    port: 6379
    password:
    timeout: 5000

  # 定时任务配置
  quartz:
    #数据库方式
    job-store-type: jdbc
    # quartz 相关属性配置
    properties:
      org:
        quartz:
          scheduler:
            instanceName: YfExamScheduler
            instanceId: AUTO
            batchTriggerAcquisitionMaxCount: 500
          threadPool:
            threadCount: 100
          jobStore:
            class: org.quartz.impl.jdbcjobstore.JobStoreTX
            driverDelegateClass: org.quartz.impl.jdbcjobstore.StdJDBCDelegate
            tablePrefix: QRTZ_
            isClustered: true
            clusterCheckinInterval: 15000
            useProperties: true
            misfireThreshold: 30000
            txIsolationLevelReadCommitted: true

# 解决负载均衡下可能导致的ID重复问题
mybatis-plus:
  global-config:
    datacenter-id: ${random.int(1,31)}
    worker-id: ${random.int(1,31)}

# 商城配置
mall:
  express:
    # 请前往https://api.kuaidi100.com/注册并开通付费
    kd100:
      query-url: http://poll.kuaidi100.com/poll/query.do
      auto-url: http://www.kuaidi100.com/autonumber/auto
      key:
      customer:

# 基础配置
ycloud:
  # 运行模式,ture为演示/false为正式
  demo: true
  # 允许跨域调用的域名,有安全要求的请配置,如:https://exam.yfhl.net
  allowed-origin: '*'
  # 开放接口秘钥
  open-secret: xxxx
  # 微信登录成功以后,将token推送到这个链接同步登录
  login-sync-pc: https://youdomain.com/pages/login/sync?token={token}
  # 微信登录成功以后,将token推送到这个链接同步登录
  login-sync-h5: https://youdomain.com/pages/login/sync?token={token}
  # druid监控账号
  druid-user: admin
  druid-password: admin

# 微信相关配置
wechat:
  login:
    # 小程序登录appId
    mp-app-id:
    mp-app-secret:
    # 网站登录appId
    site-app-id:
    site-app-secret:
    redirect: https://yourdomain.com/api/common/wx/redirect
    # 公众号配置
    oa-app-id:
    oa-app-secret:
    oa-redirect: https://yourdomain.com/api/common/wx/h5-redirect
    # 绑定微信响应
    bind-redirect: https://yourdomain.com/api/common/wx/bind


# 企业微信
crop-wechat:
  login:
    crop-id:
    agent-id:
    crop-secret:
    redirect: https://yourdomain.com/api/common/crop-wechat/redirect
    bind-redirect: https://yourdomain.com/api/common/crop-wechat/bind

# 钉钉
ding-talk:
  login:
    app-key:
    app-secret:
    redirect: https://yourdomain.com/api/common/ding-talk/redirect
    bind-redirect: https://yourdomain.com/api/common/ding-talk/bind

# 支付配置
pay:
  # 支付实例,修改enabled为true则打开,false则关闭
  providers:
    - name: wechat
      enabled: true
    - name: alipay
      enabled: true
    - name: paypal
      enabled: true

  wechat:
    # AppId,通常为wx开头的18位左右字符
    app-id:
    # App秘钥
    app-secret:
    # 商户号,通常为10位数字
    mch-id:
    # 商户API私钥。商户申请商户API证书时,会生成商户私钥,并保存在本地证书文件夹的文件apiclient_key.pem中
    private-key:
    # API v3密钥。为了保证安全性,微信支付在回调通知和平台证书下载接口中,对关键信息进行了AES-256-GCM加密。API v3密钥是加密时使用的对称密钥。商户可以在【商户平台】->【API安全】的页面设置该密钥。
    api-v3-key:
    # 证书序列号。每个证书都有一个由CA颁发的唯一编号,即证书序列号。如何查看证书序列号请看这里 https://wechatpay-api.gitbook.io/wechatpay-api-v3/chang-jian-wen-ti/zheng-shu-xiang-guan#ru-he-cha-kan-zheng-shu-xu-lie-hao
    mch-serial-no:
    # 支付回调地址
    notify-url: https://yourdomain.com/api/pay/wechat/notify

  # 支付宝支付
  alipay:
    # 应用ID,您的APPID,收款账号既是您的APPID对应支付宝账号
    app-id:
    # 商户私钥,您的PKCS8格式RSA2私钥
    merchant-private-key:
    # 支付宝公钥,查看地址:https://openhome.alipay.com/platform/keyManage.htm 对应APPID下的支付宝公钥。
    alipay-public-key:
    # 服务器异步通知页面路径  需http://格式的完整路径,不能加?id=123这类自定义参数,必须外网可以正常访问
    notify-url: https://yourdomain.com/api/pay/alipay/notify
    # 服务器同步通知页面路径  需http://格式的完整路径,不能加?id=123这类自定义参数,必须外网可以正常访问
    return-url: https://yourdomain.com/api/pay/alipay/return

  # Paypal支付配置
  paypal:
    mode: sandbox
    app:
    secret:
    return-url: https://yourdomain.com/api/pay/paypal/query
    cancel-url: https://yourdomain.com/api/pay/paypal/cancel
    # 该标签将覆盖PayPal网站上PayPal帐户中的公司名称
    brand: 云帆互联

# 生产环境建议关闭文档
# 文档访问地址:http://localhost:8101/doc.html
swagger:
  enable: false

logging:
  level:
    root: error
  # 日志文件目录
  path: logs/${spring.application.name}/
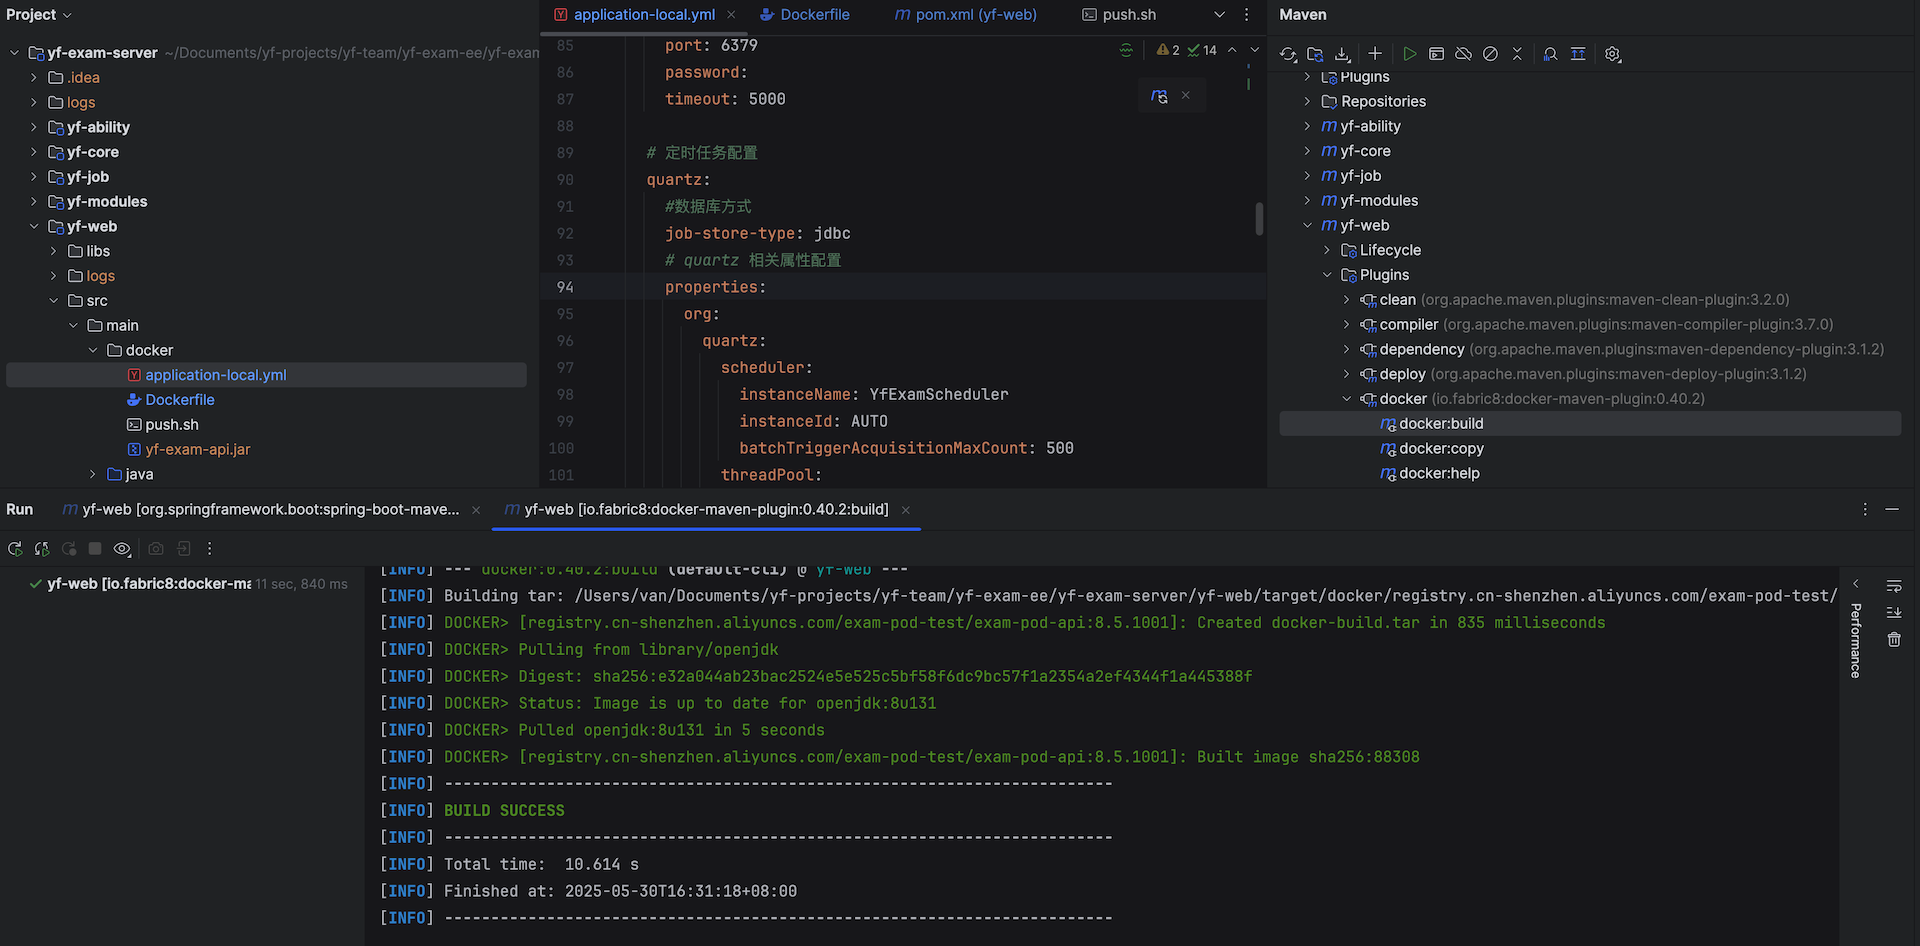
打包镜像
执行Maven插件,运行docker:build,如下: 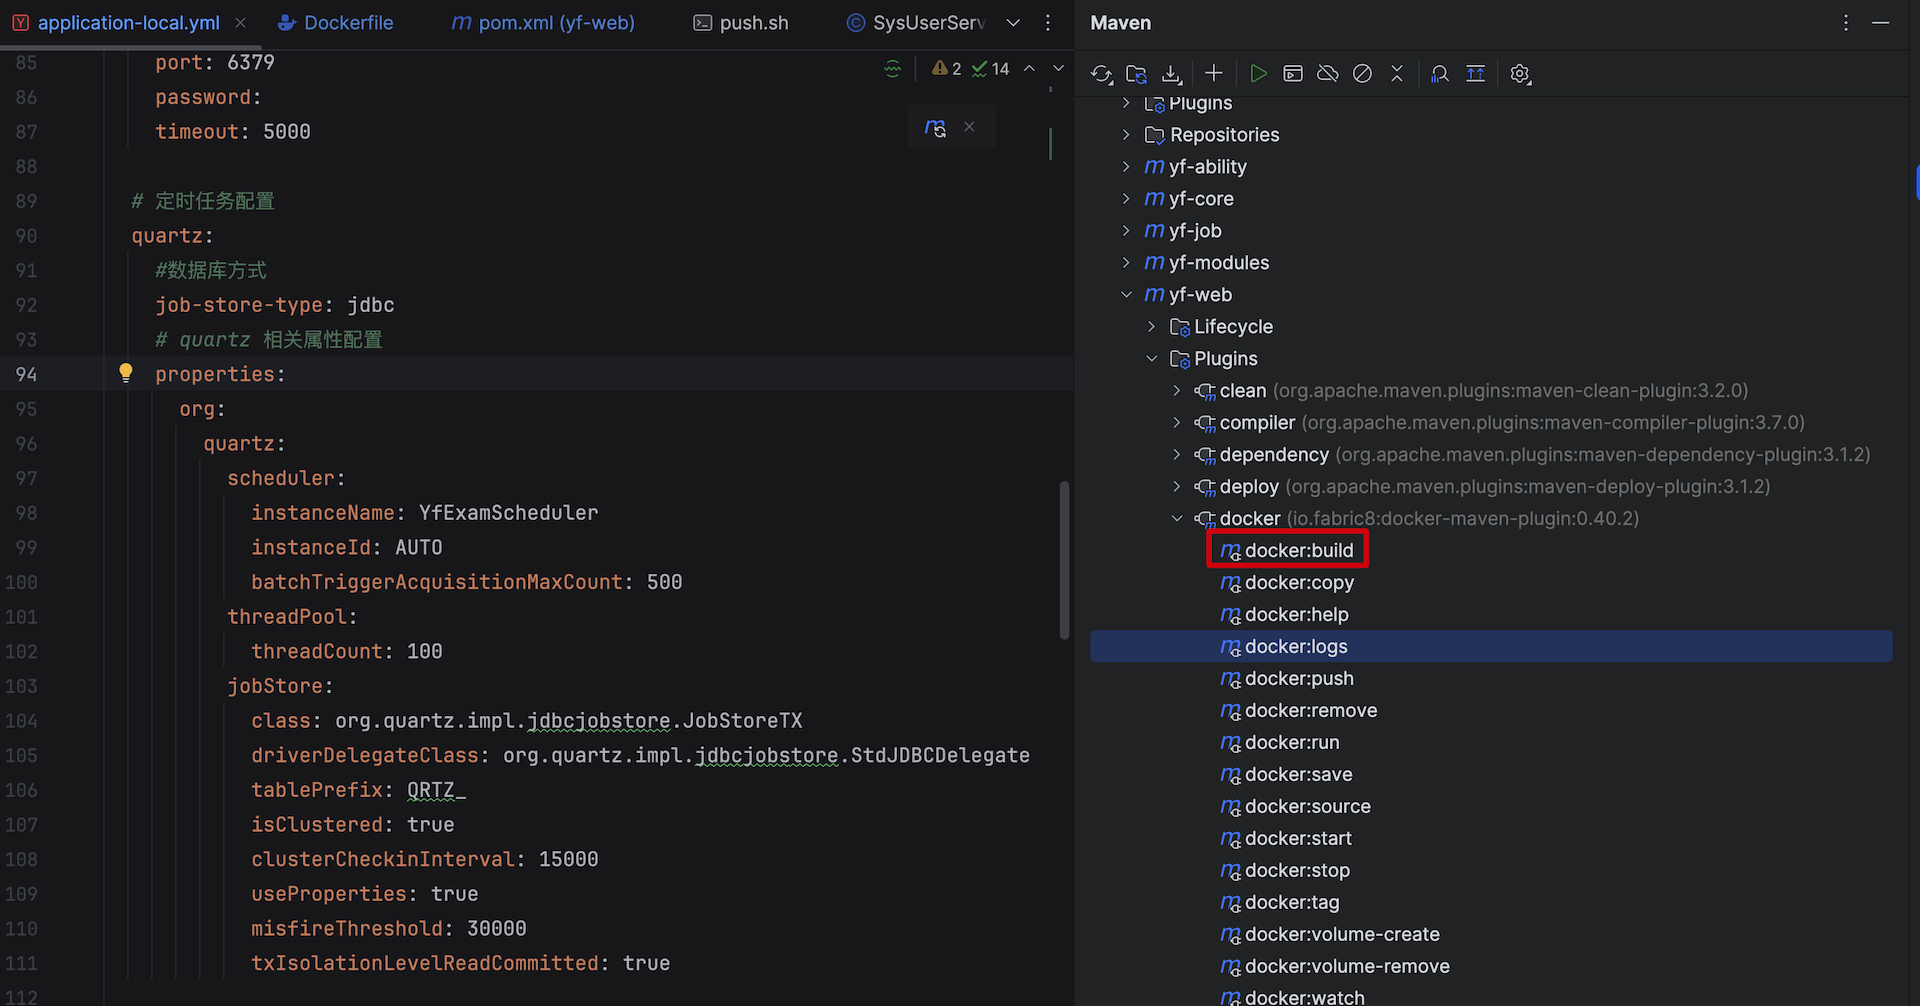
推送本地镜像到镜像仓库
执行docker push命令将本地镜像推送到阿里云镜像仓库中
# 格式为 镜像仓库地址:版本号,请根据实际版本进行推送
docker push registry.cn-shenzhen.aliyuncs.com/exam-pod-test/exam-pod-api:8.5.1001

查看镜像版本
推送成功后,我们可以在镜像仓库看到此版本 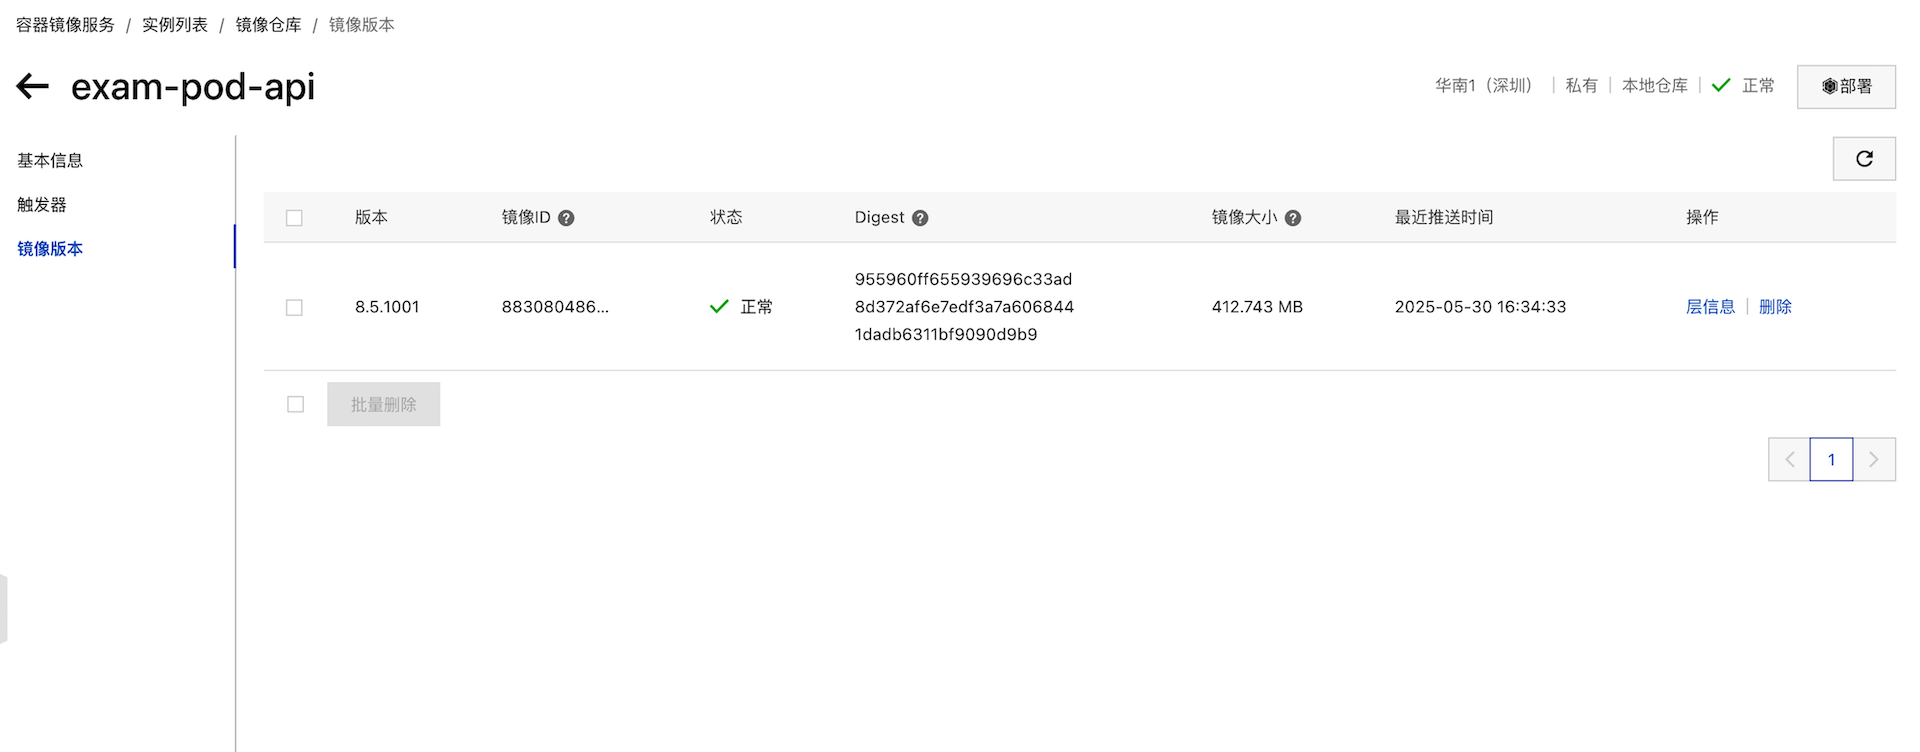
开通Serverless服务
创建命名空间
开通Serverless应用引擎SAE服务后,先创建命名空间,命名空间很重要,需要后续设置网络访问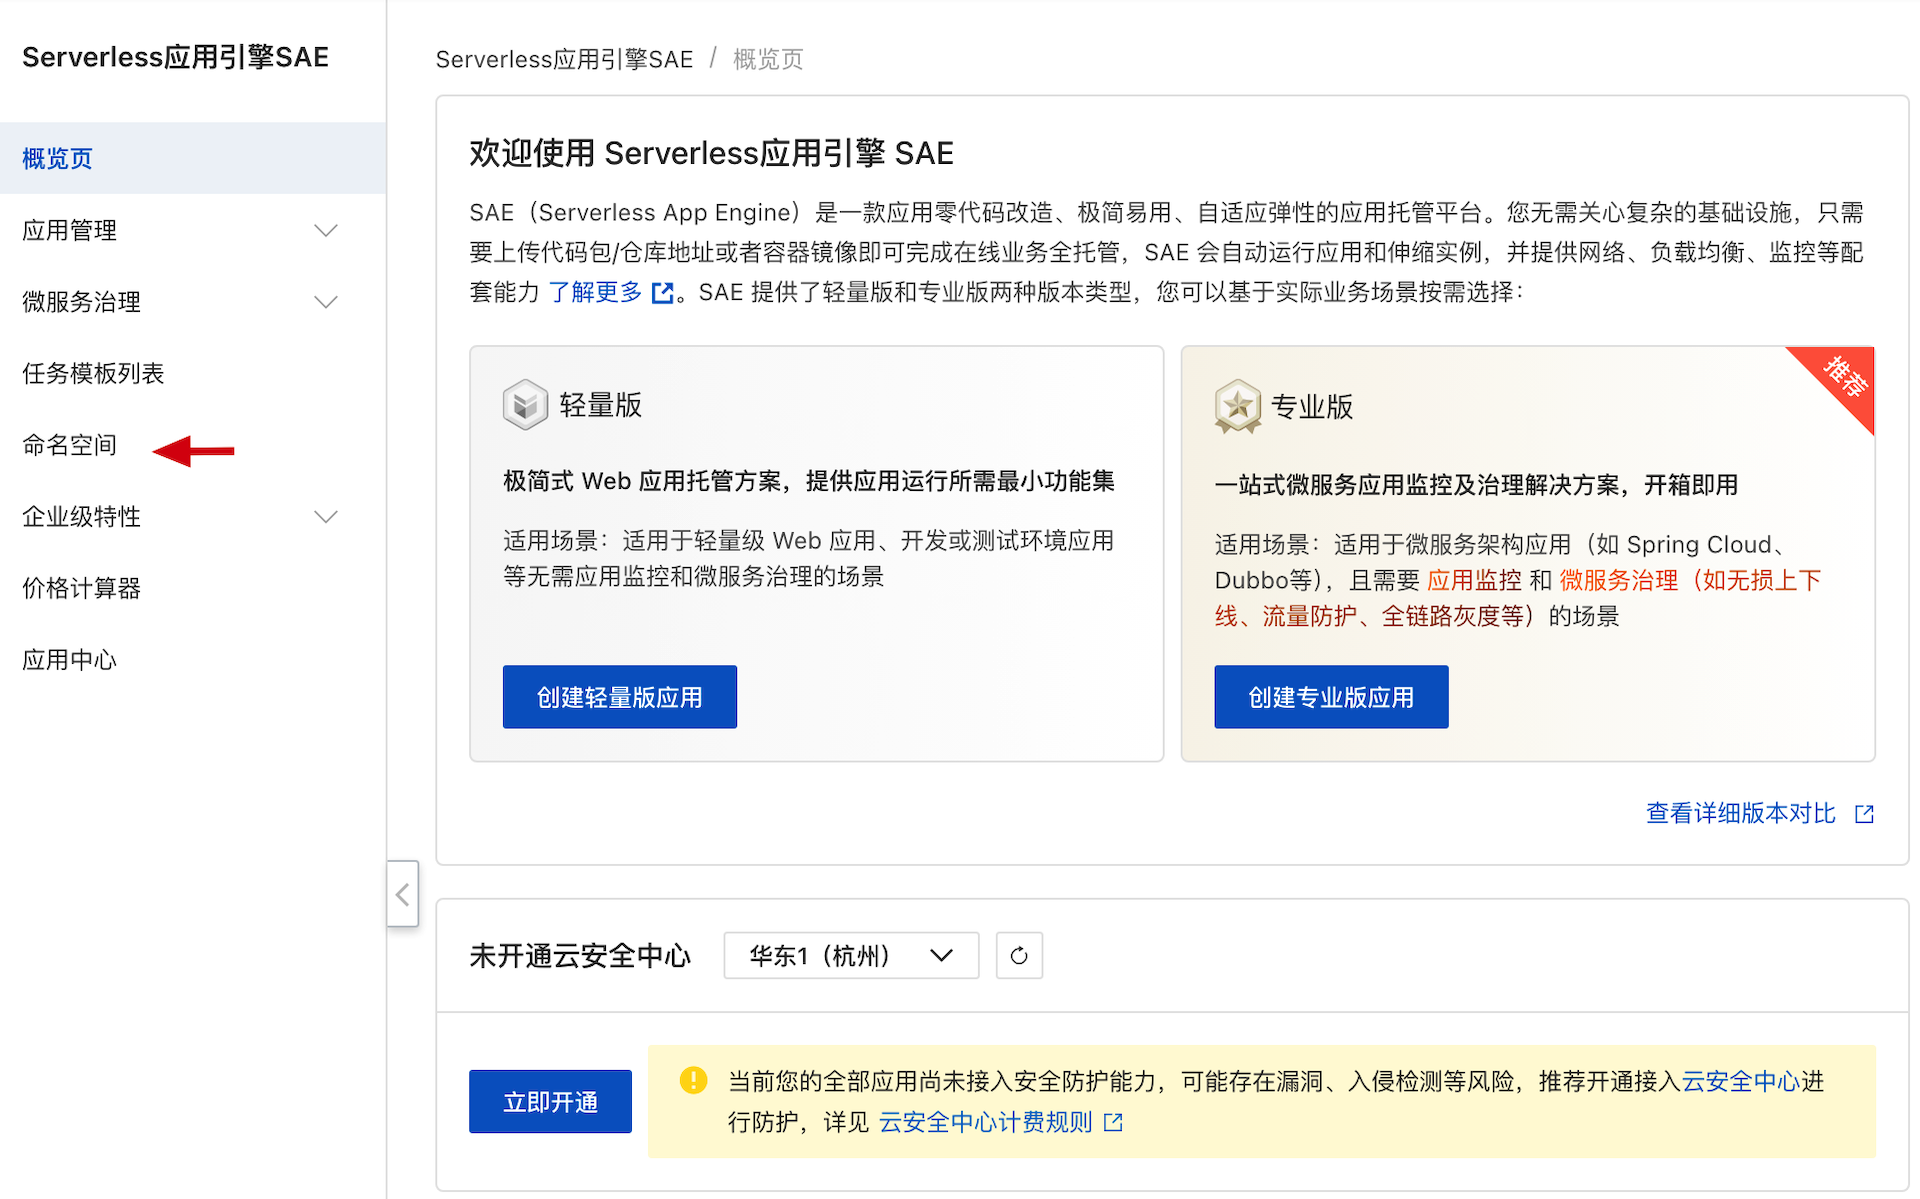
创建轻量应用
回到应用列表,创建服务,选择轻量版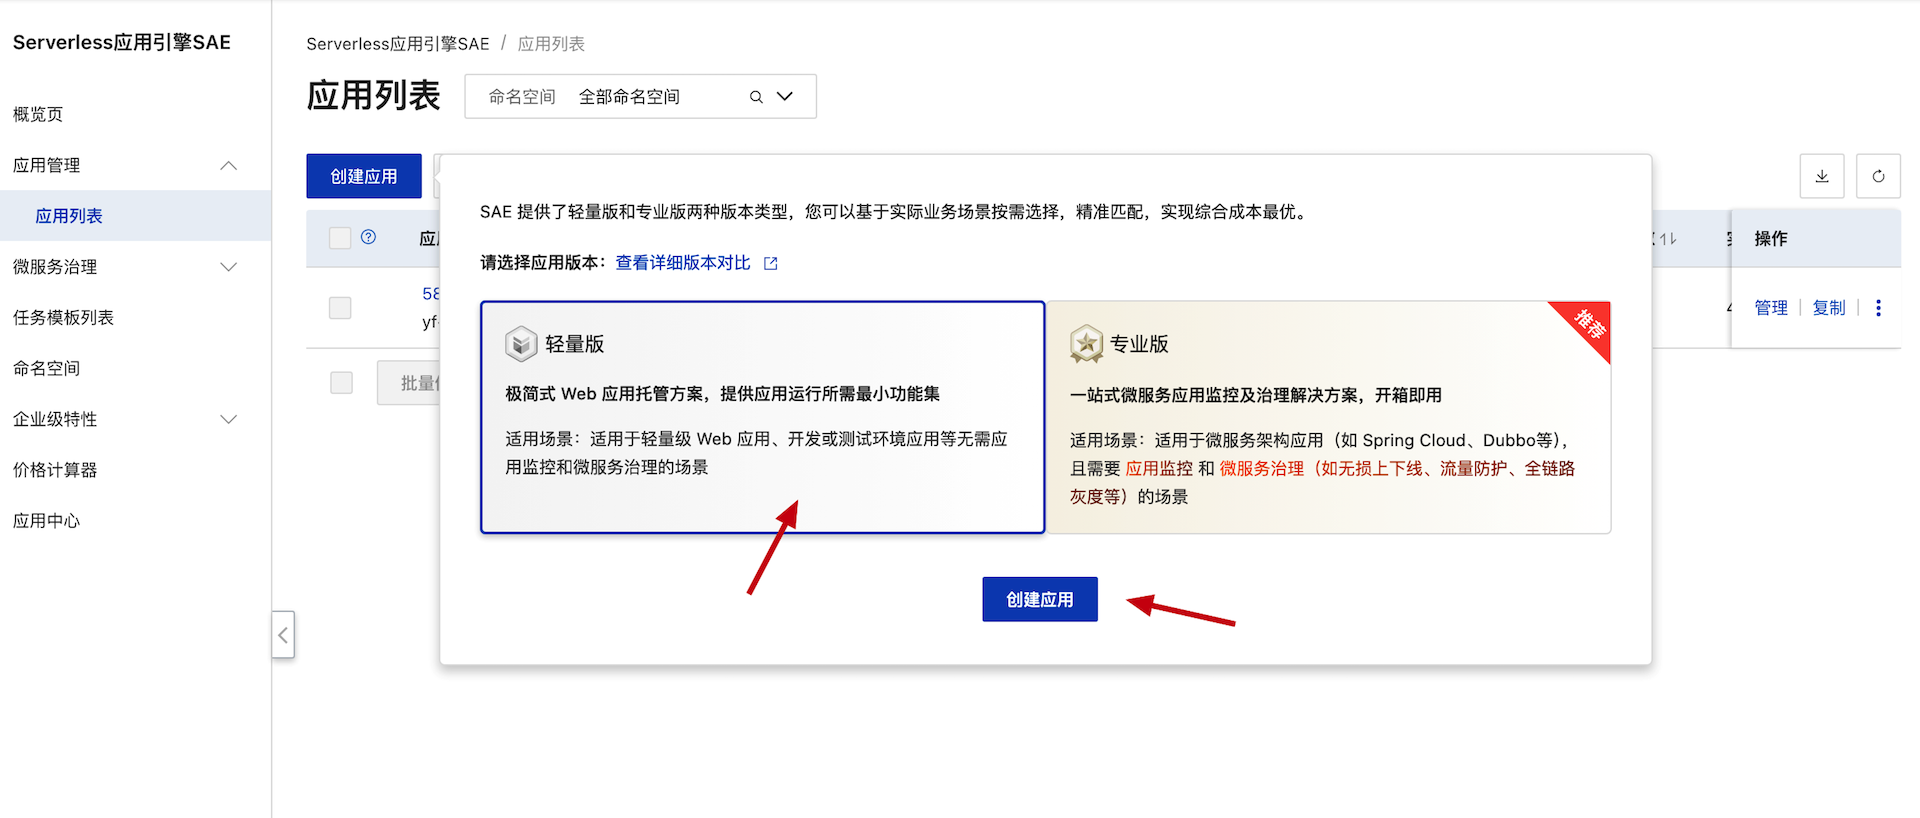
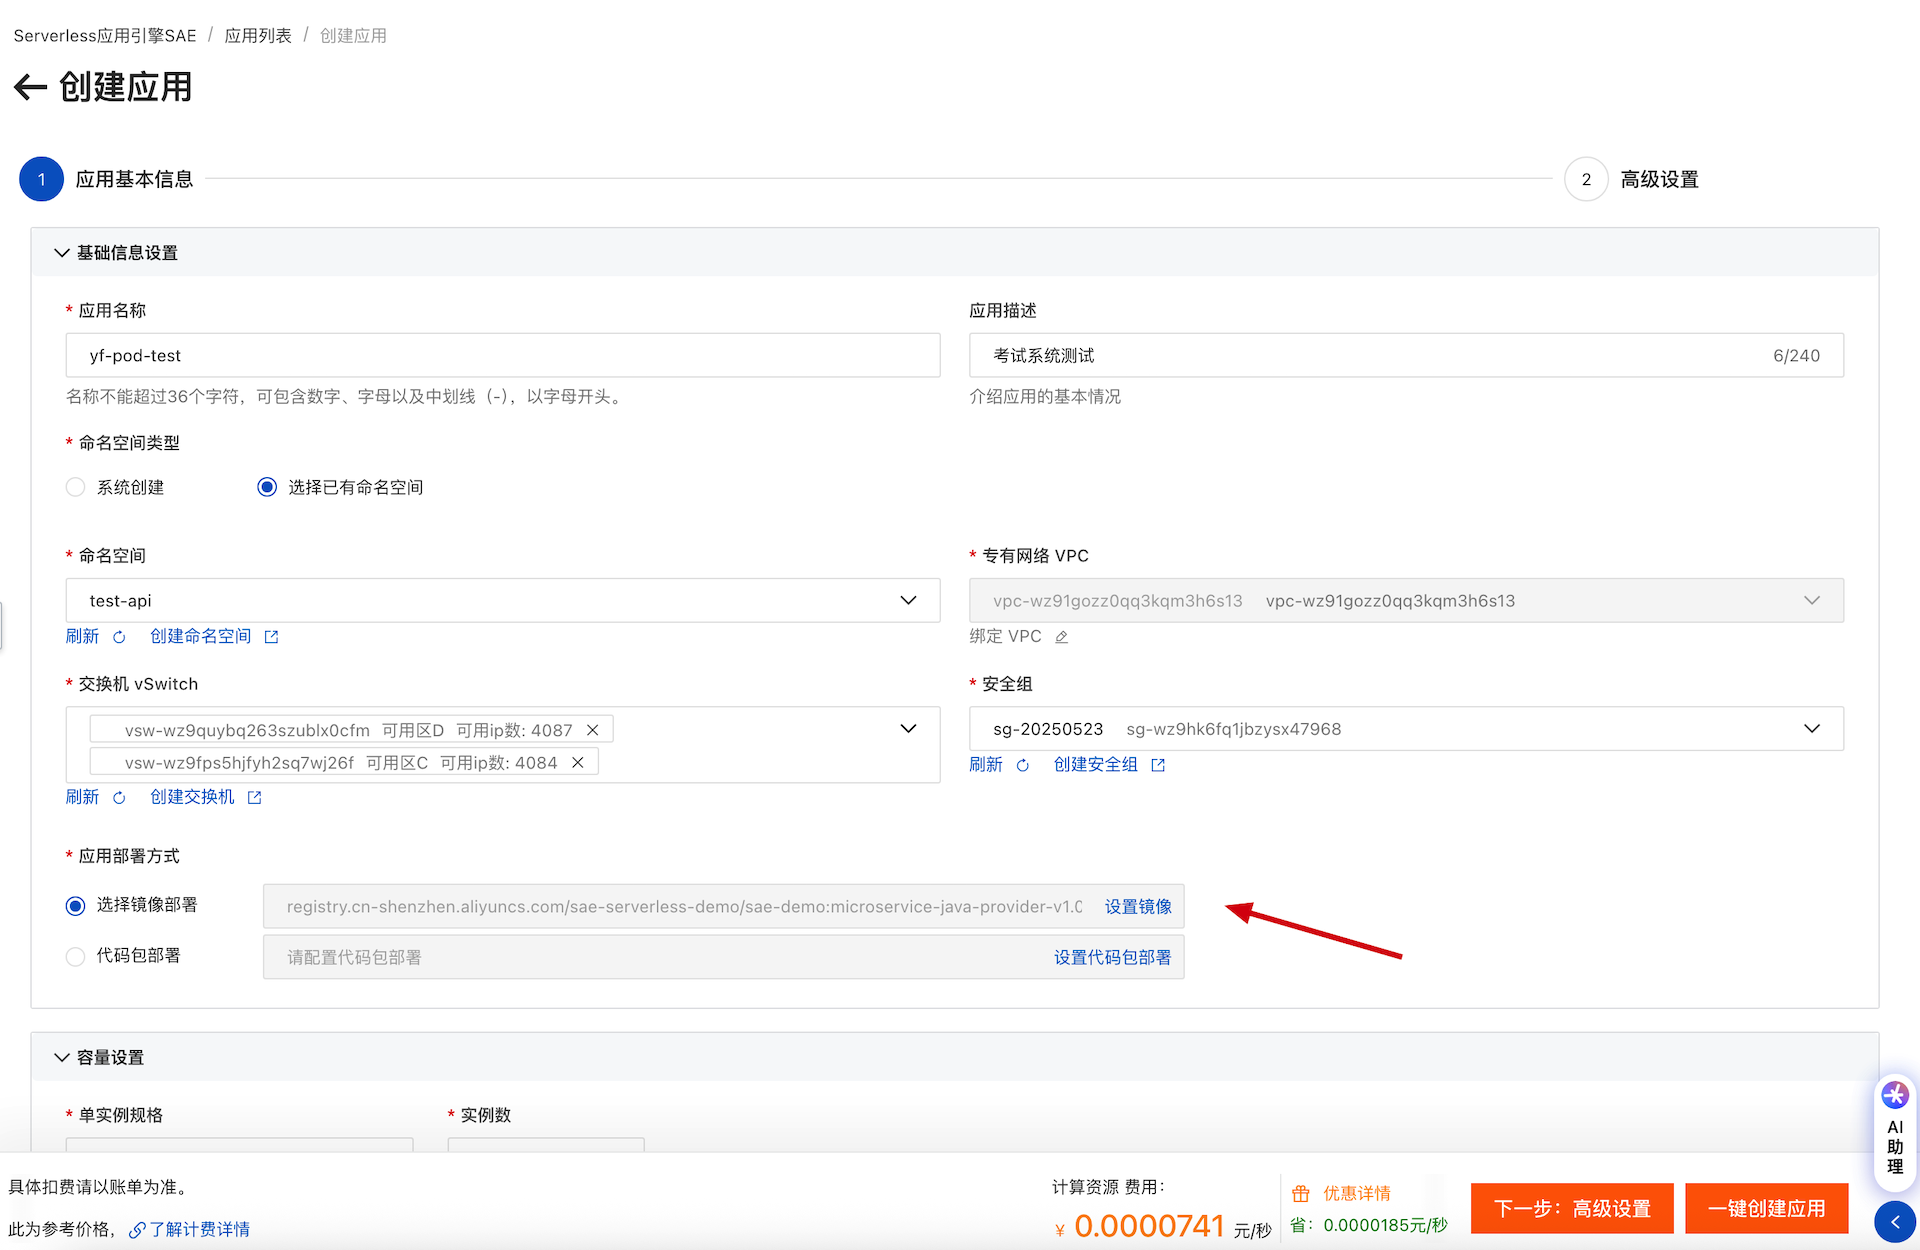 选择镜像部署,我的阿里云镜像,选择我们之前上传好的镜像
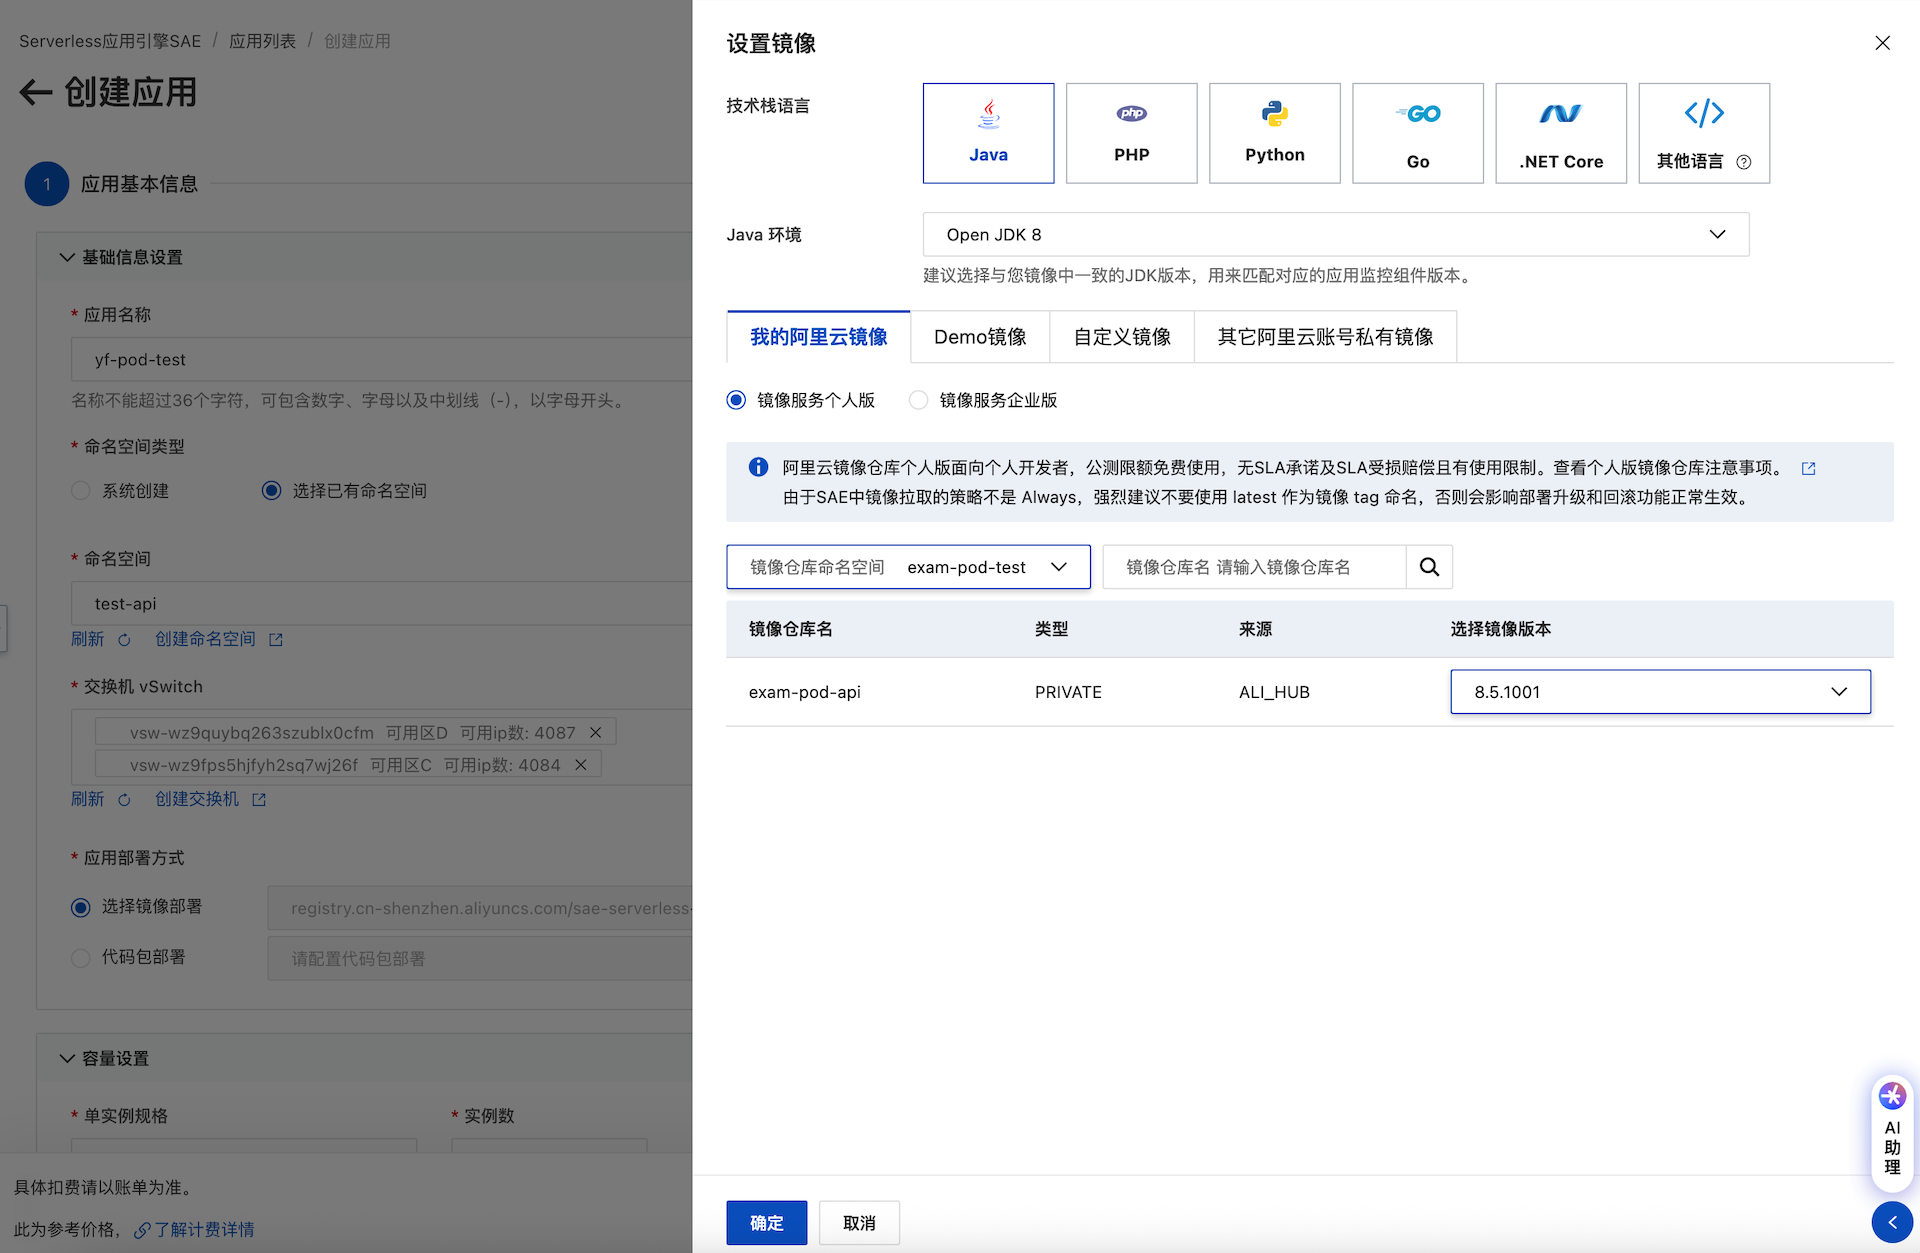
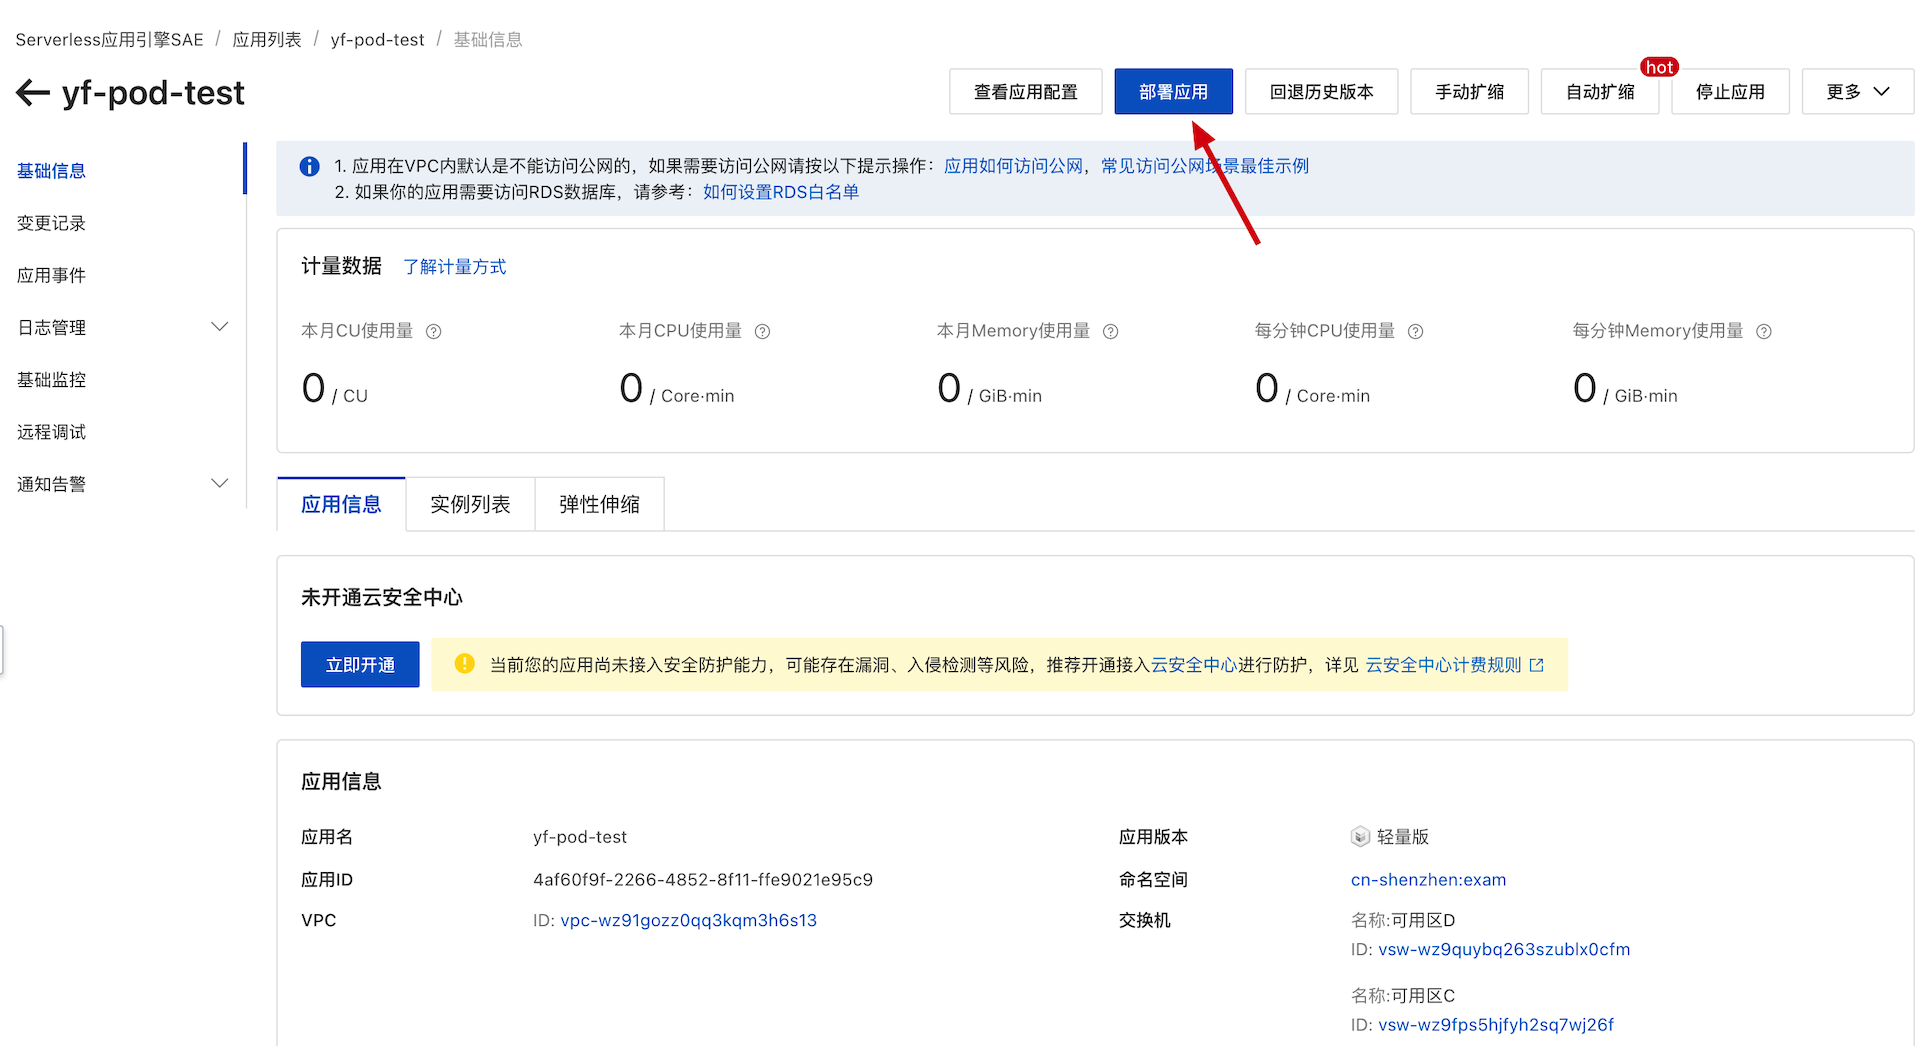
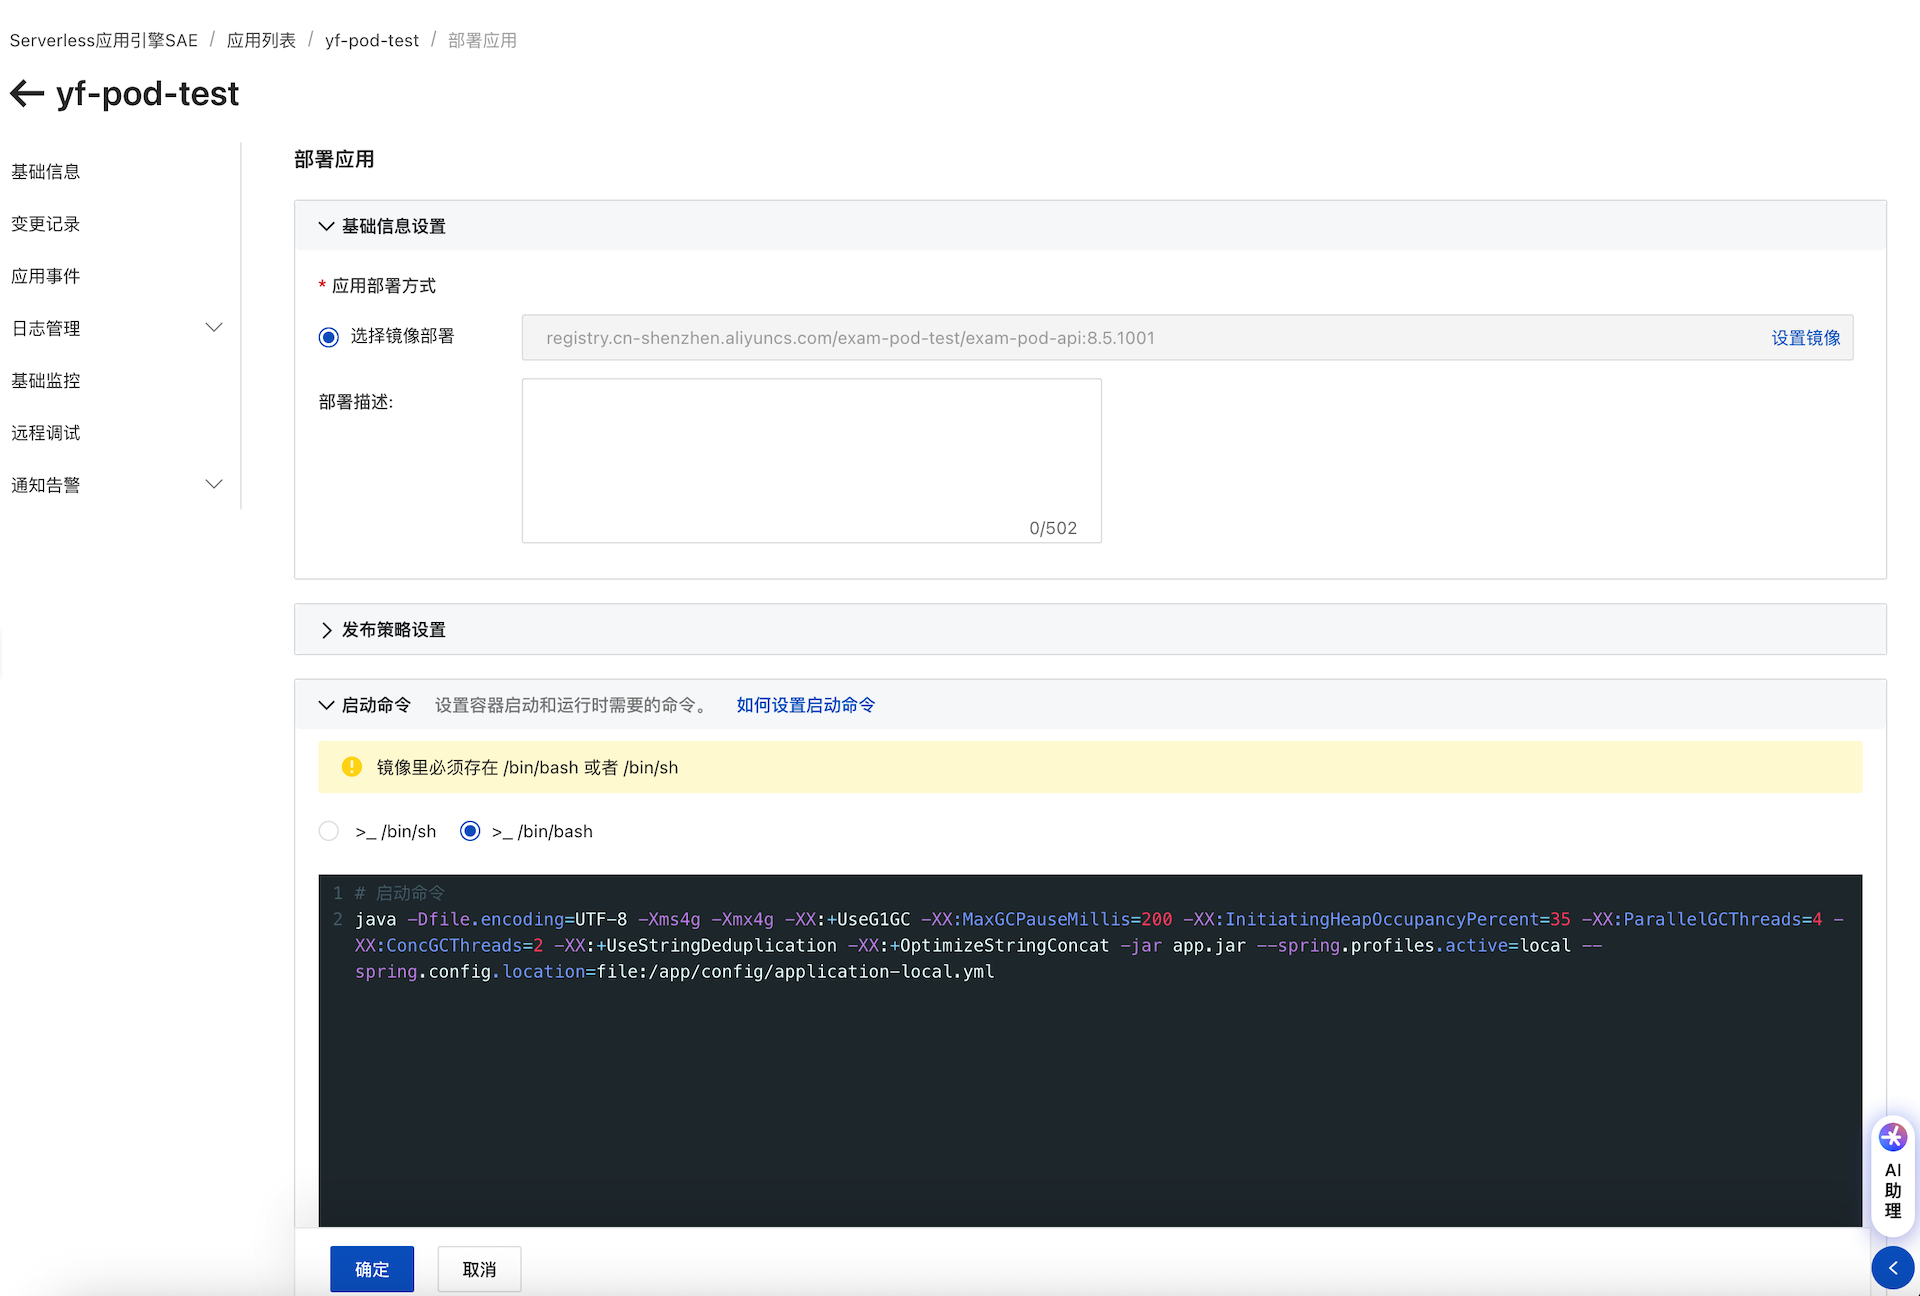
部署应用
部署应用,为了灵活调整java启动参数,我们的Dockerfile里面不包含java运行命令,因为我们在调整pod规格时,启动参数也要随之变化,以便于提高硬件利用率
# 启动命令
java -Dfile.encoding=UTF-8 -Xms4g -Xmx4g -XX:+UseG1GC -XX:MaxGCPauseMillis=200 -XX:InitiatingHeapOccupancyPercent=35 -XX:ParallelGCThreads=4 -XX:ConcGCThreads=2 -XX:+UseStringDeduplication -XX:+OptimizeStringConcat -jar app.jar --spring.profiles.active=local --spring.config.location=file:/app/config/application-local.yml
开通公网访问
应用部署好以后,只能提供内网访问,如果需要外网访问或绑定域名等操作,还需要进行开通公网访问
点击详情,进入命名空间 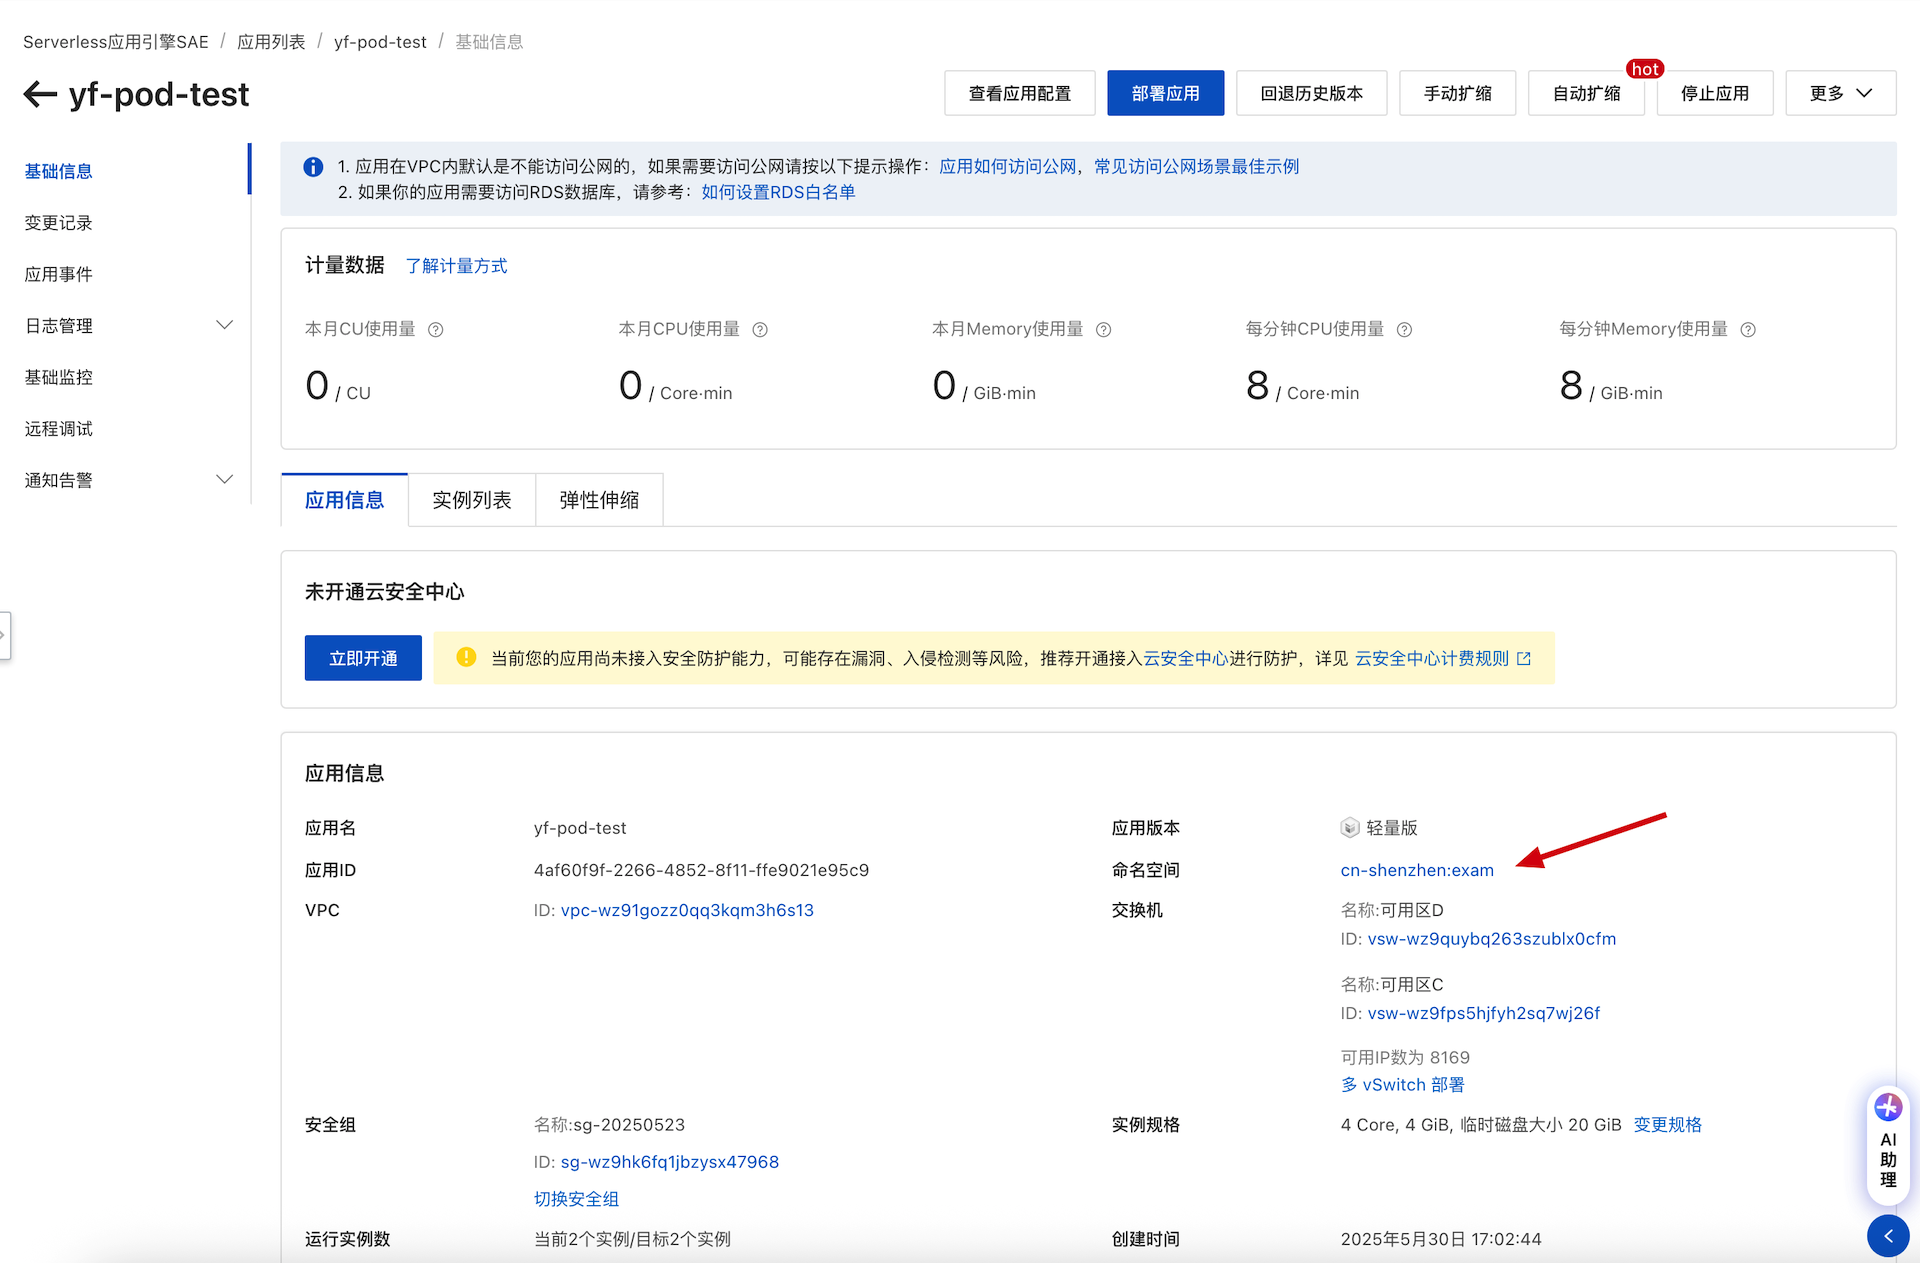
网关路由 > 创建网关路由 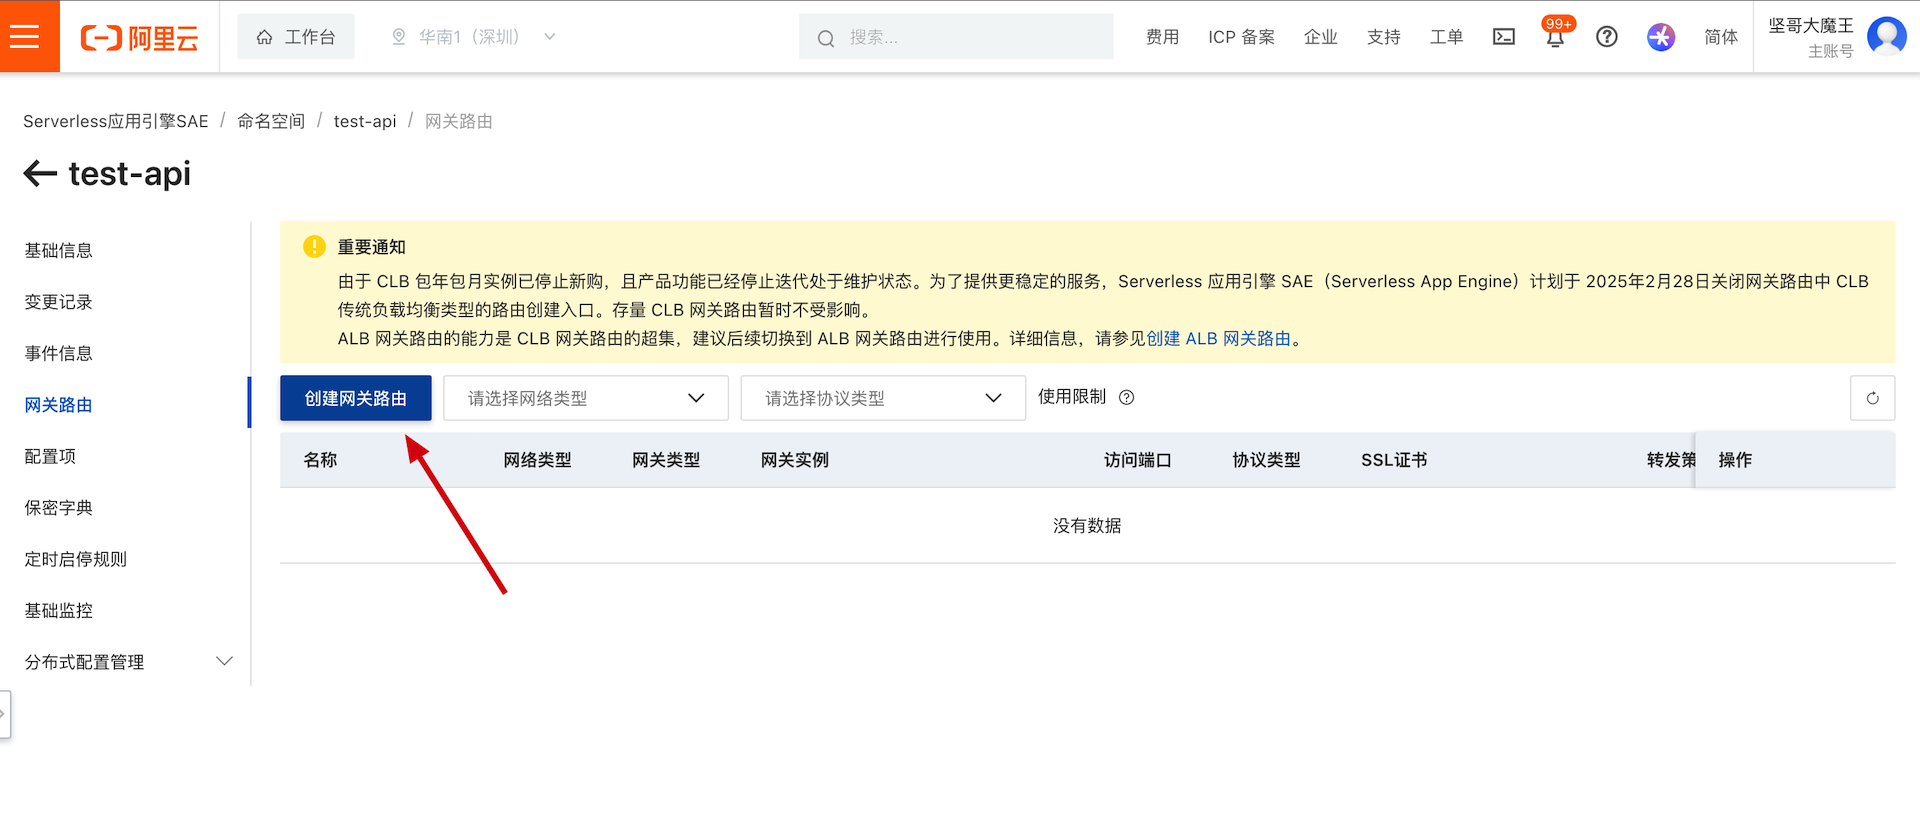
实际上是绑定一个负载均衡服务,确定访问端口,对应的后端服务器端口 因为我们的服务运行在8101端口,所以容器端口为8101* 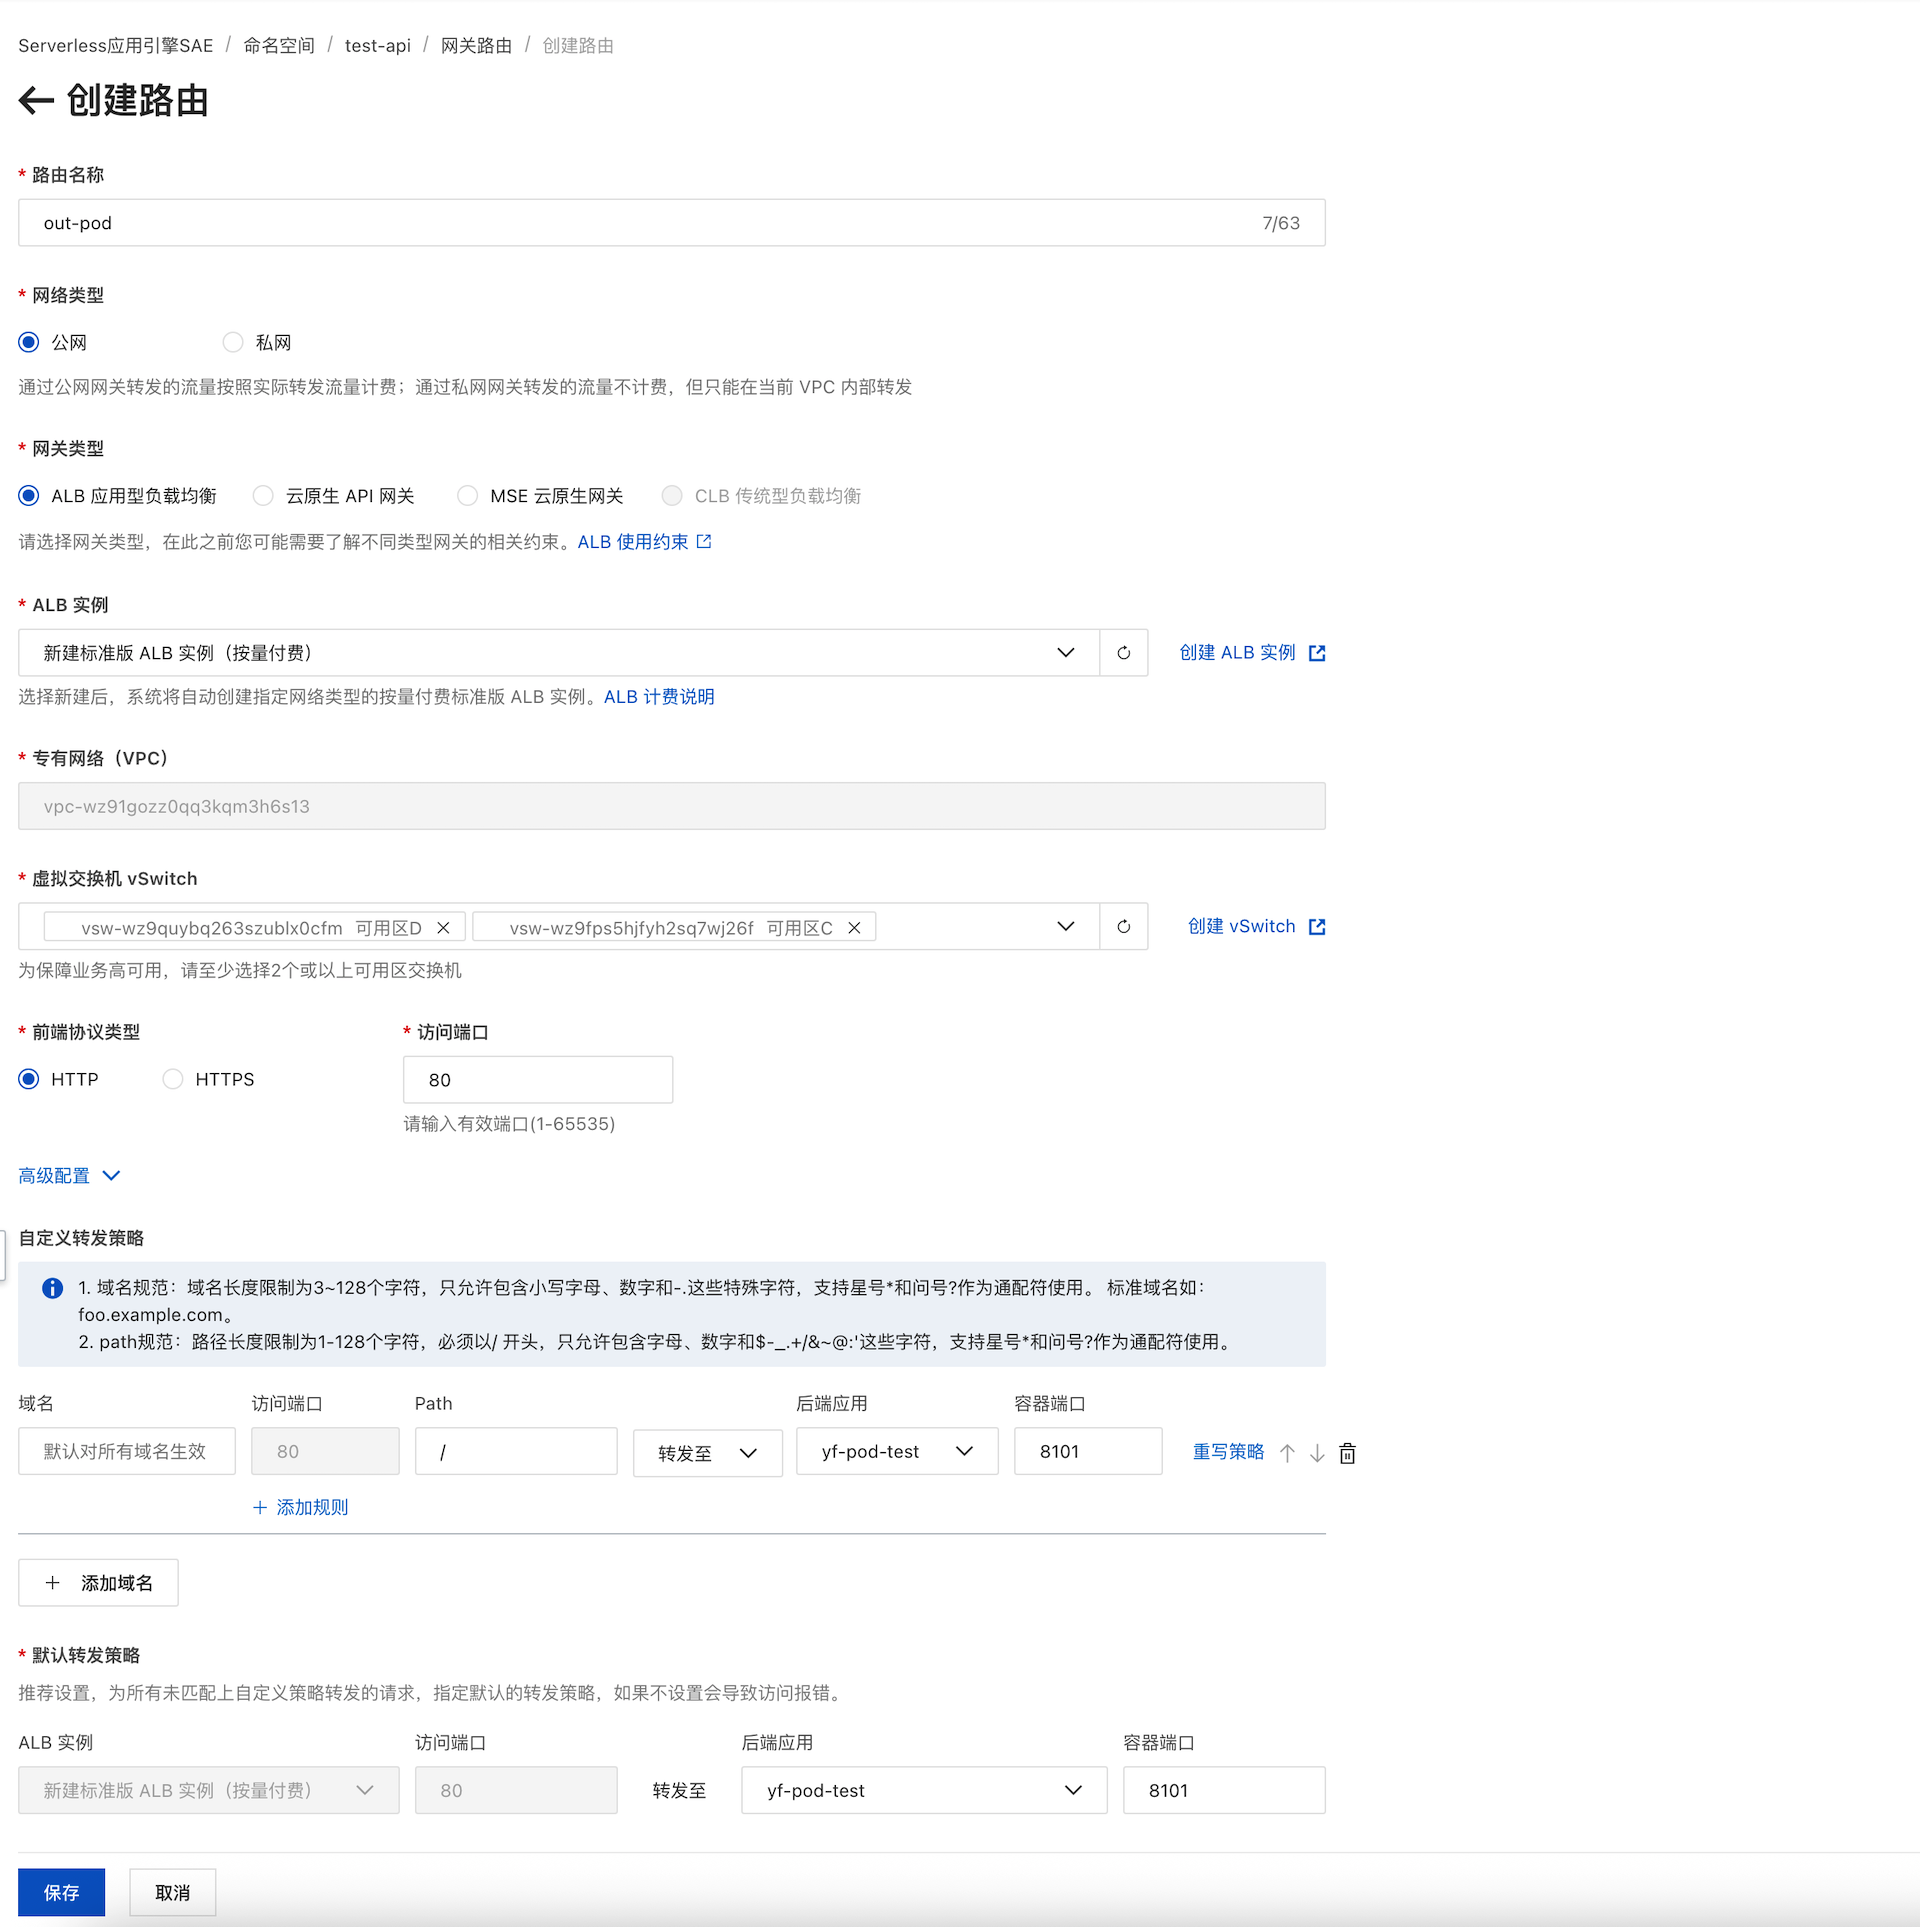
创建好以后,进入负载均衡详情页面 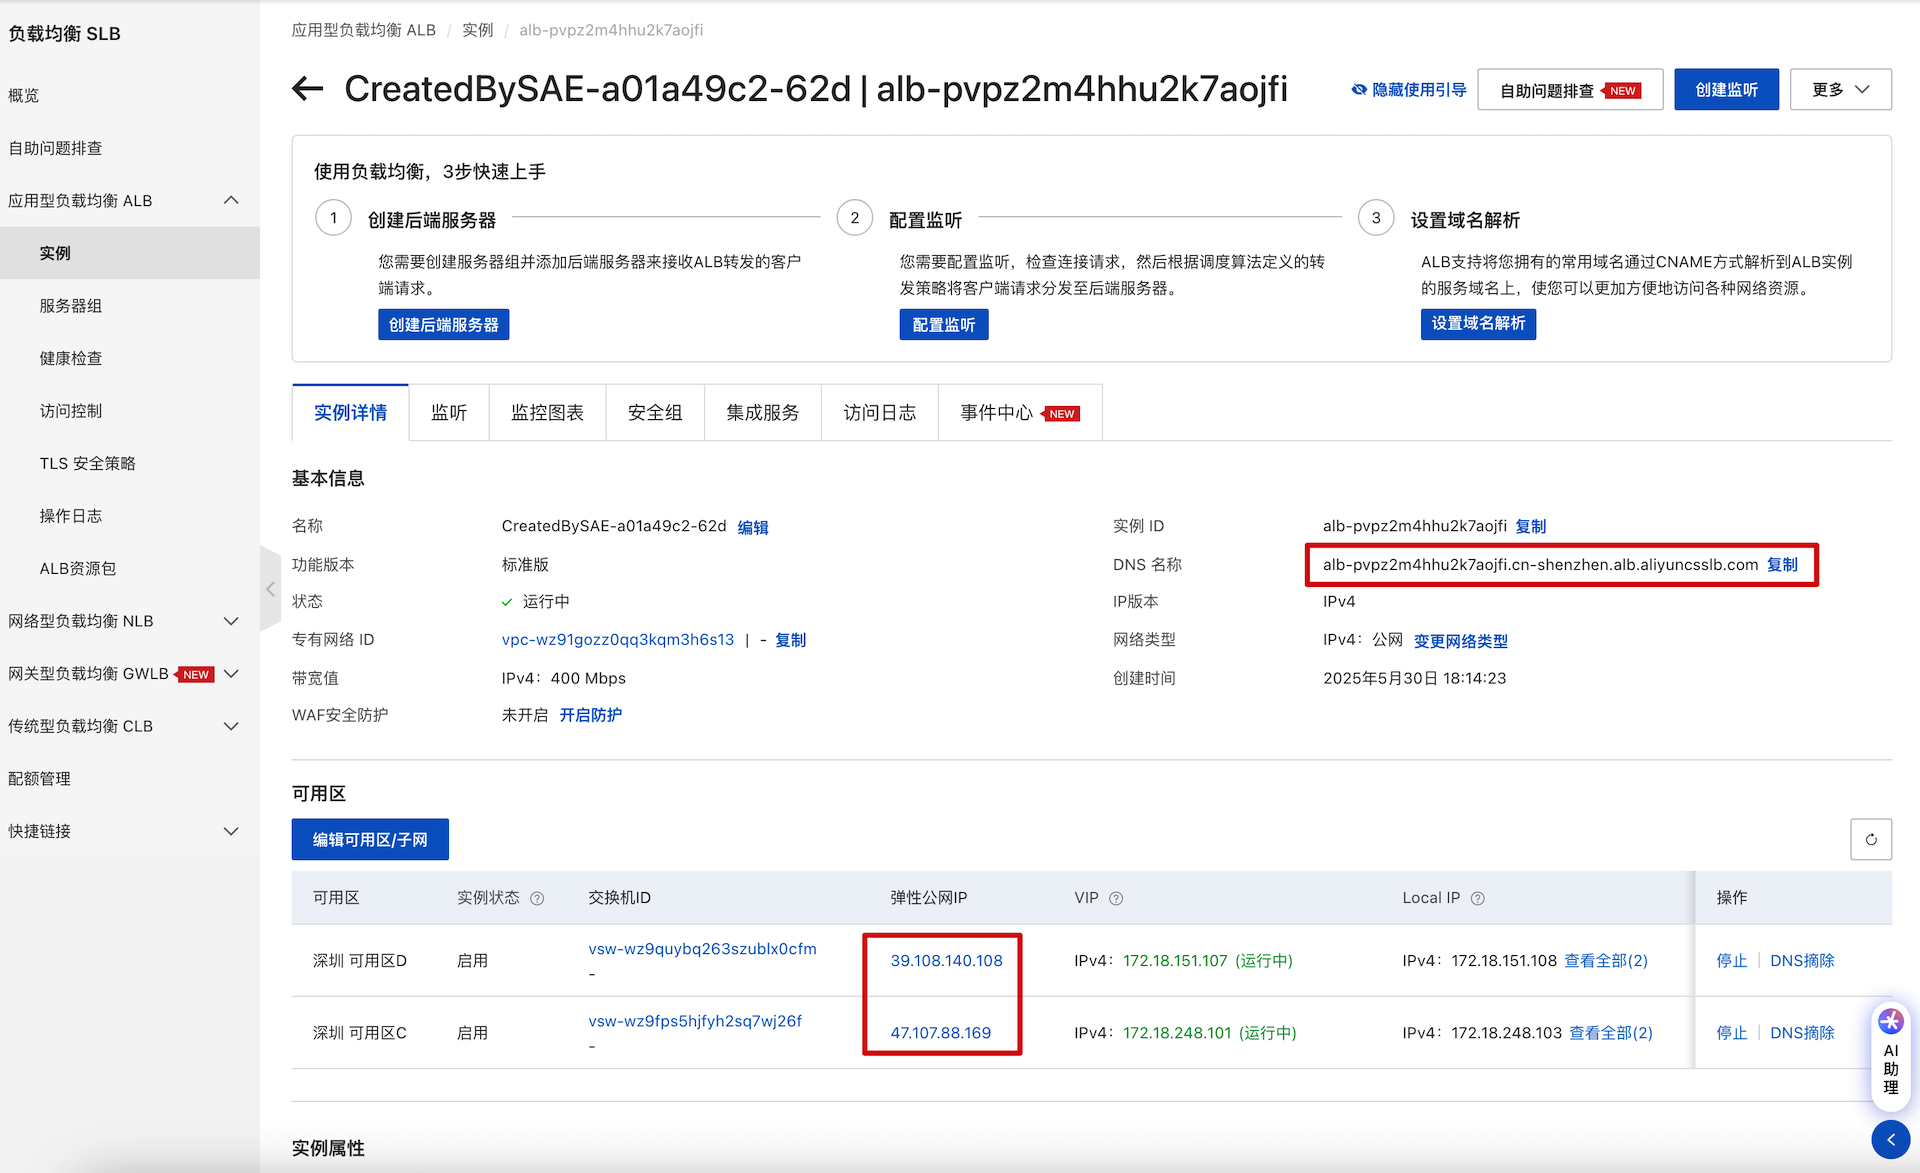
DNS名称:用域名绑定CNAME记录即可访问
弹性公网IP:绑定了两个交换机,都可以访问项目,选择就近的IP访问即可
wget http://39.108.140.108:8101
wget http://47.107.88.169:8101
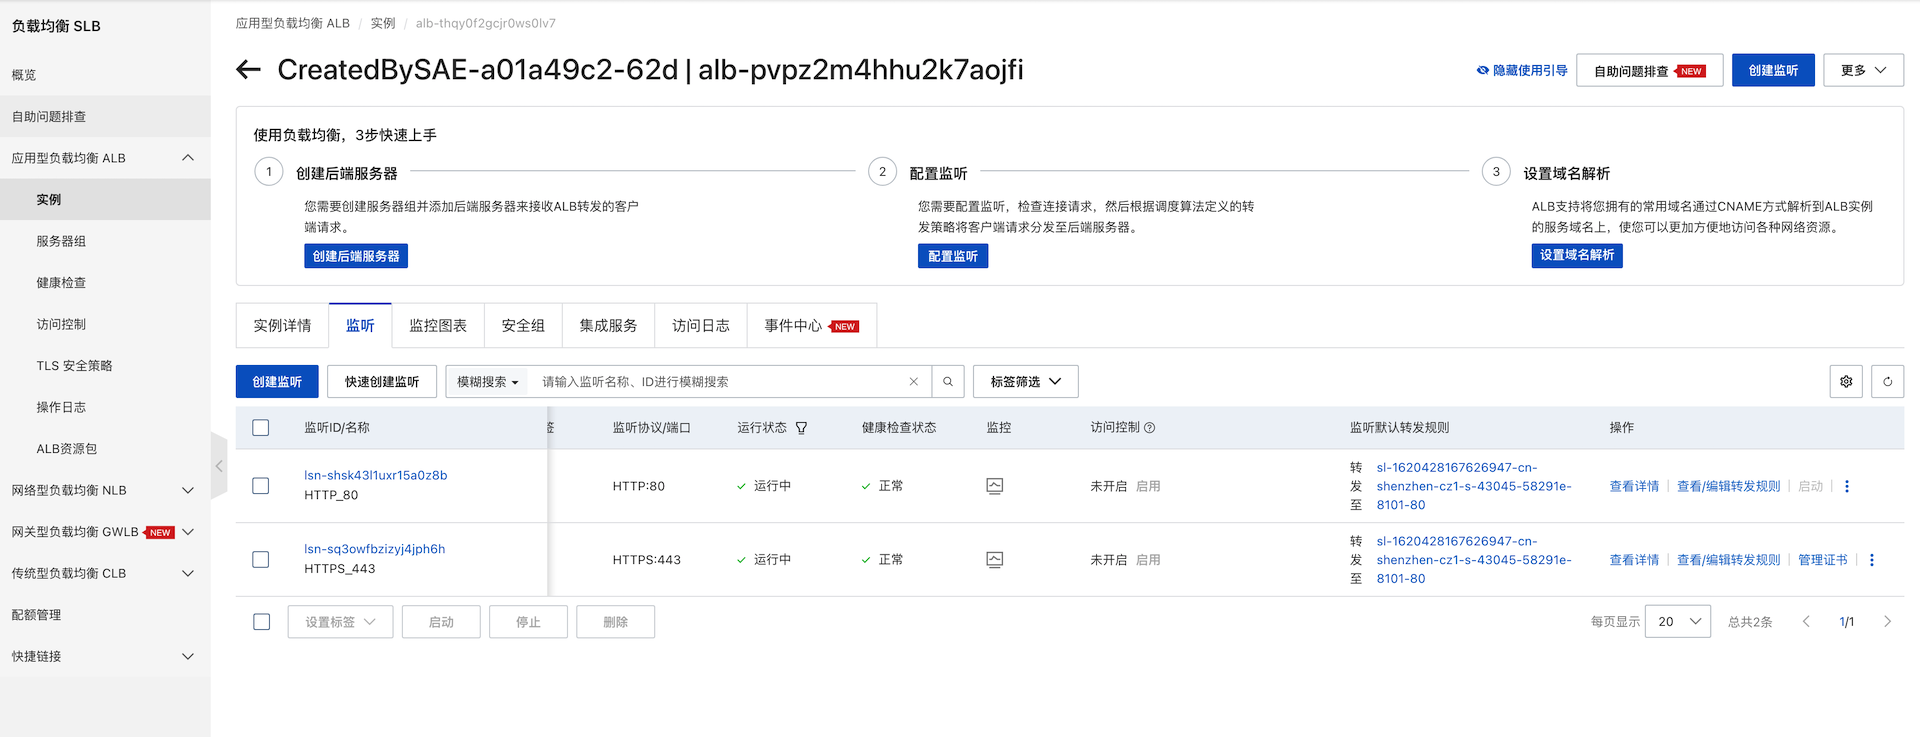
监听端口
我们绑定域名访问时,可能并不希望带上端口,如:http://pod.yfhl.net:8101,看起来别扭,我们可以增加以下端口的监听:
- 80端 口:对应 http://pod.yfhl.net
- 443端口:对应 https://pod.yfhl.net
443端口需要绑定SSL证书,请自行申请
配置好的端口监听如下: